NexHub
Build beautiful link-in-bio pages, humanize URLs, and manage digital content with NexHub, powered by GoValid.
Overview
NexHub is a comprehensive link-in-bio and microsite platform that lets you create multi-page personal or business hubs with 35+ content blocks, shorten URLs with memorable AI-generated slugs, build registration forms, manage media libraries, and publish blog posts. Available at nexhub.earth.
NexHub Sidebar Navigation
The NexHub dashboard features a dedicated sidebar with the following sections:
| Menu Item | Description | URL |
|---|---|---|
| NeX Community | Community feed and social features | Community |
| Template NexHub | Browse and select from pre-designed hub templates | Template NexHub |
| Create NexHub | Create a new hub or QR code from scratch | Create NexHub |
| Humanize Link | Create memorable AI-generated short URLs | Humanize Link |
| My NexHub | View and manage all your hubs and QR codes | My NexHub |
| Form Builder | Create and manage registration forms | Form Builder |
| Media Library | Upload and manage images and documents | Media Library |
| Blog | Write and manage blog posts | Blog |
| Shared Hubs | Hubs you collaborate on (if any) | Shared Hubs |
Template NexHub
Browse and select from a gallery of pre-designed hub templates to instantly style your NexHub page.
Template Categories
Templates are organized into categories for easy browsing:
| Category | Best For |
|---|---|
| Nature | Outdoor, environmental, eco-friendly brands |
| Earth | Sustainability, global initiatives |
| Animal | Pet services, wildlife, veterinary |
| Energy | Power, fitness, dynamic content |
| Business | Corporate, professional services |
| Professional | Consultants, freelancers, agencies |
| Tech | Software, startups, digital products |
| Education | Schools, courses, training |
| Creator | Content creators, influencers |
| Creative | Artists, designers, photographers |
| Minimal | Clean, simple personal profiles |
| Fashion | Style, clothing, beauty brands |
| Music | Musicians, bands, audio content |
| Food | Restaurants, recipes, culinary |
| Travel | Tourism, blogs, adventure |
| Sport | Athletics, fitness, teams |
| Health | Wellness, medical, healthcare |
| Event | Conferences, weddings, parties |
| Special | Promotions, seasonal, limited-time |
How to Use Templates
- Navigate to Template NexHub from the sidebar
- Browse templates by category or view all
- Click a template to select it
- Choose up to 4 background style preferences in the modal
- Click Continue to start customizing your hub
Template Features
- Full-screen phone mockup previews with auto-rotating slideshows
- Featured and New badges on select templates
- Category filtering for quick browsing
- Option to skip templates and start from scratch
Create NexHub
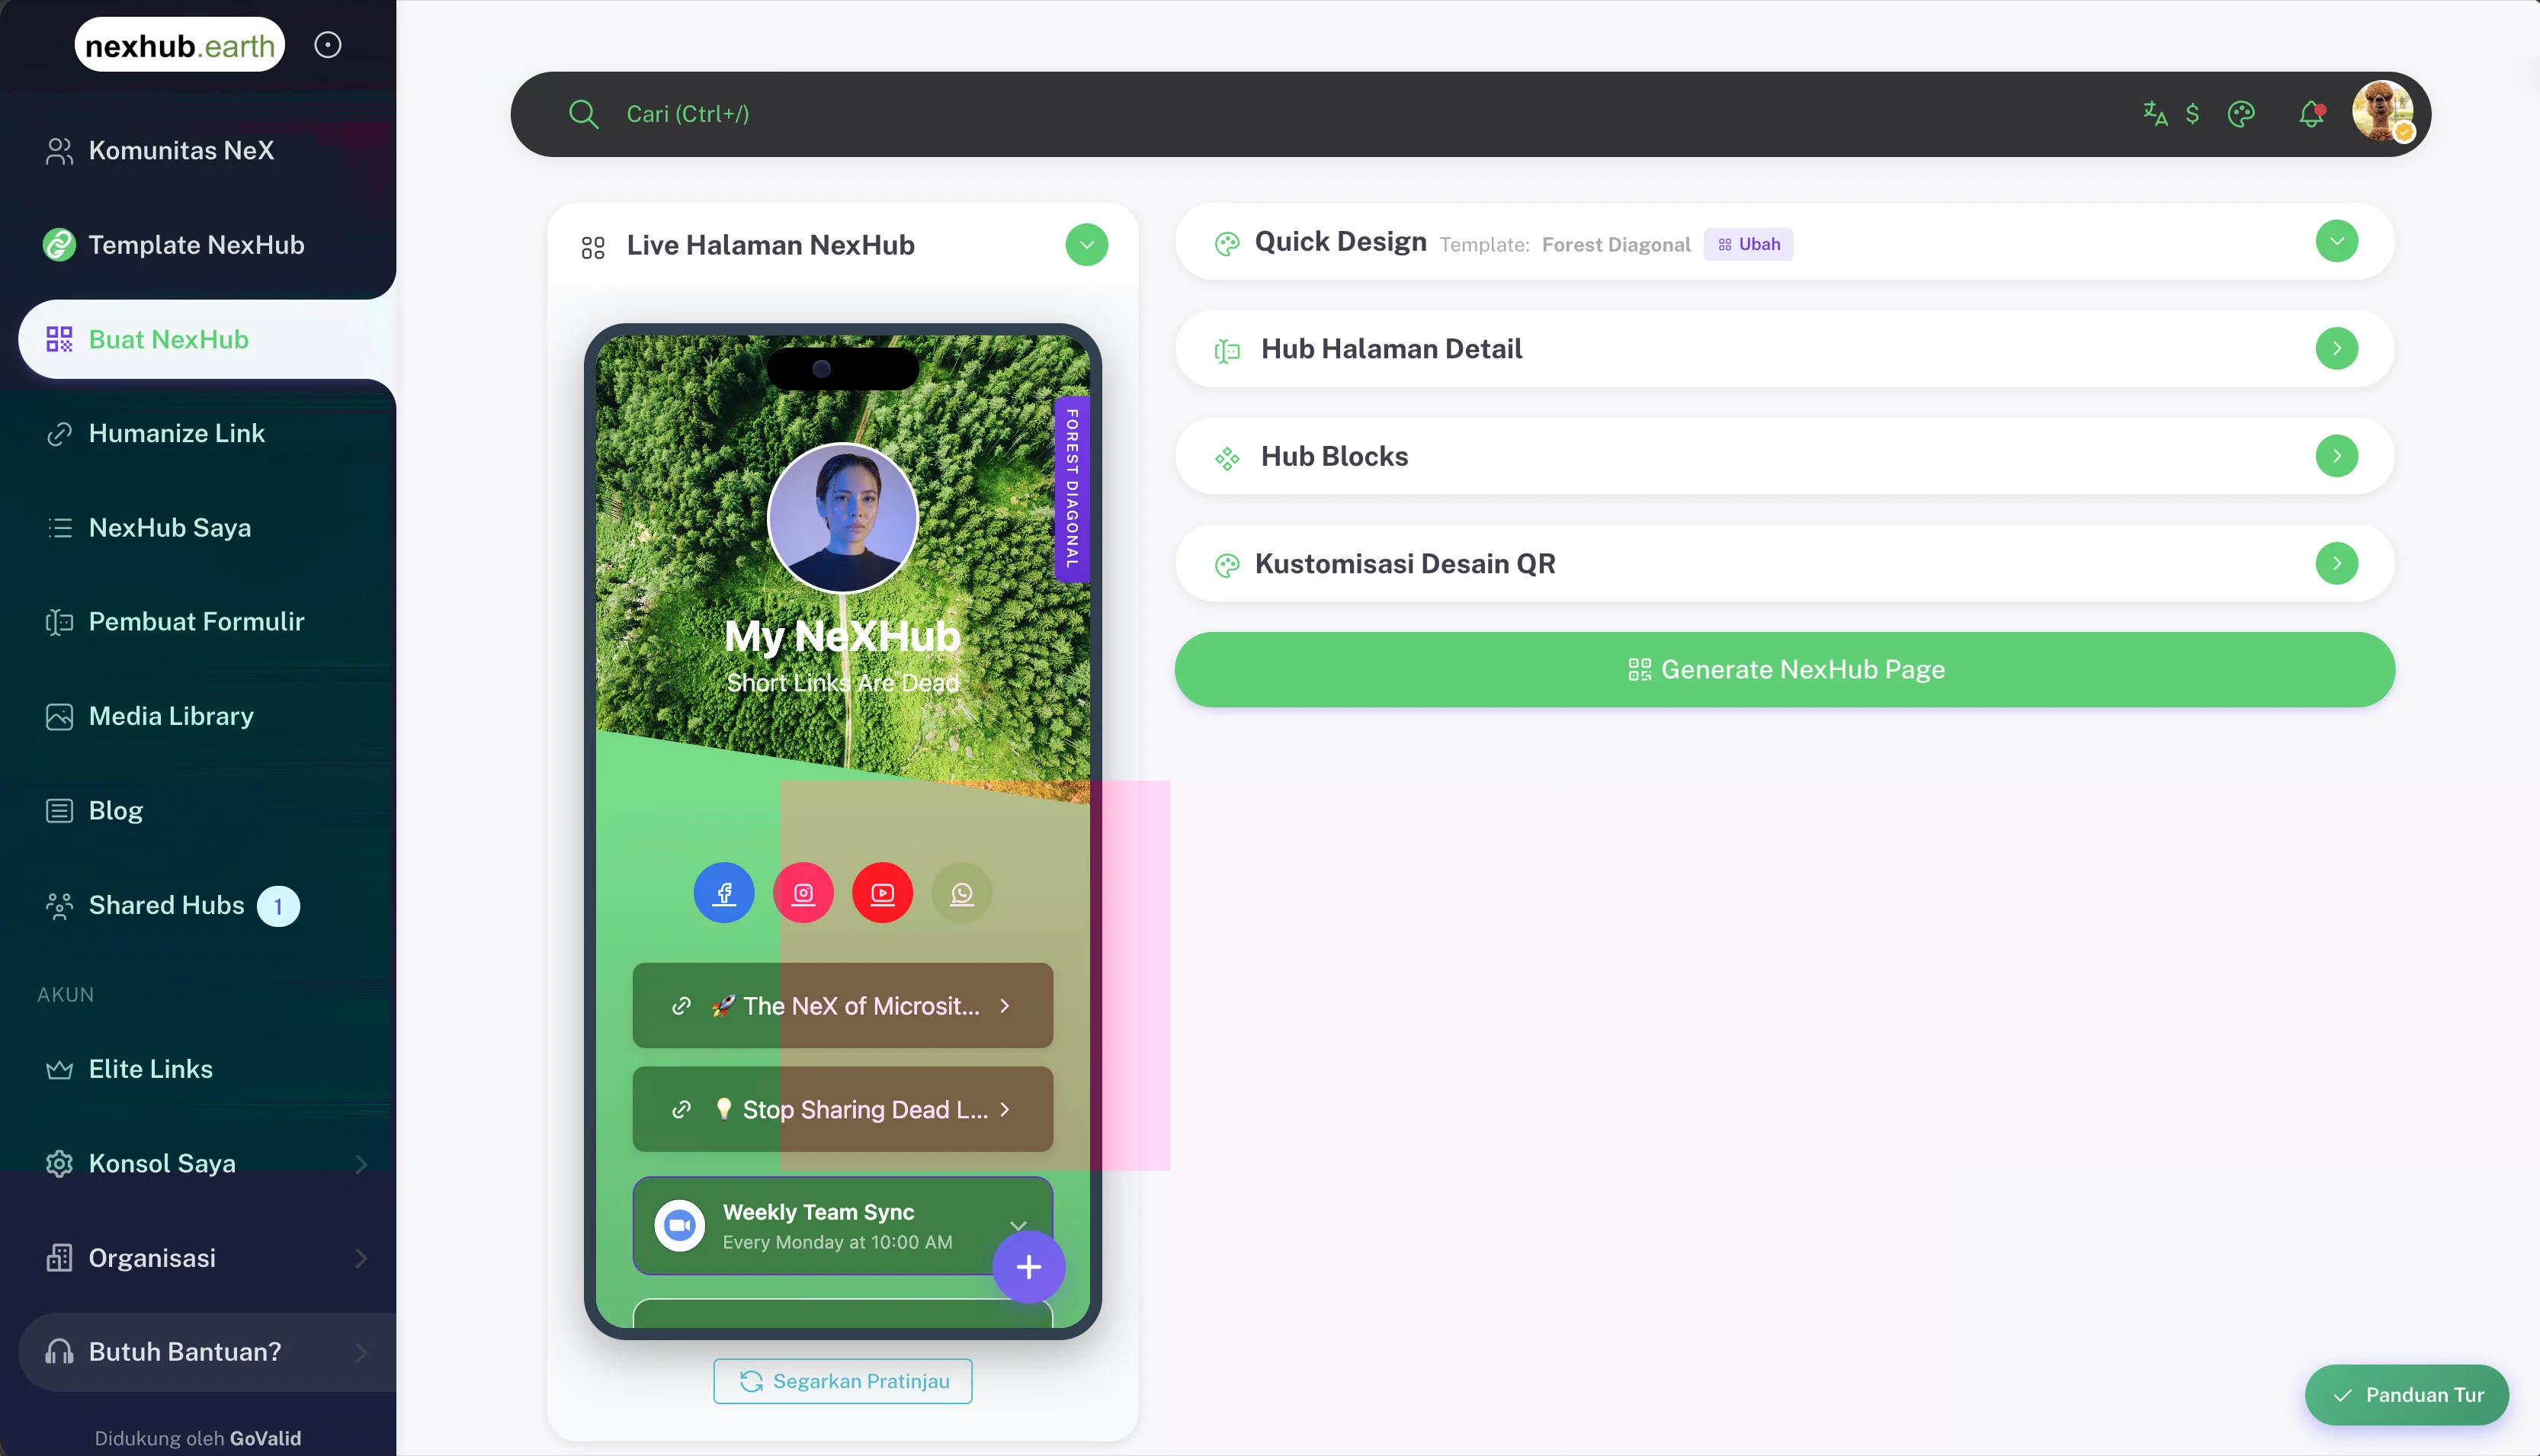
The main hub creation and editing interface. Build your NexHub page using a visual panel with four collapsible sections.
Hub QR Types
NexHub supports multiple QR types beyond just hubs:
| QR Type | Description |
|---|---|
| Hub | Full link-in-bio page with content blocks |
| URL | Simple link redirect with custom short URL |
| WiFi | WiFi access QR code |
| Text | Plain text display |
| Email compose QR | |
| Phone | Phone call QR |
| SMS | SMS message QR |
| WhatsApp message QR | |
| VCard | Contact card QR |
| Location | Map location QR |
| App | App store link QR |
| Payment | Payment QR (QRIS, etc.) |
| Menu | Digital menu for restaurants |
| Feedback | Feedback/survey form |
| Event | Event information and RSVP |
| Coupon | Coupon/discount QR |
| Check-in | Attendance/presence tracking |
| Guestbook | Visitor guestbook |
| Business | Business page with contact info |
| Queue | Queue management system |
| Loyalty | Loyalty stamp card |
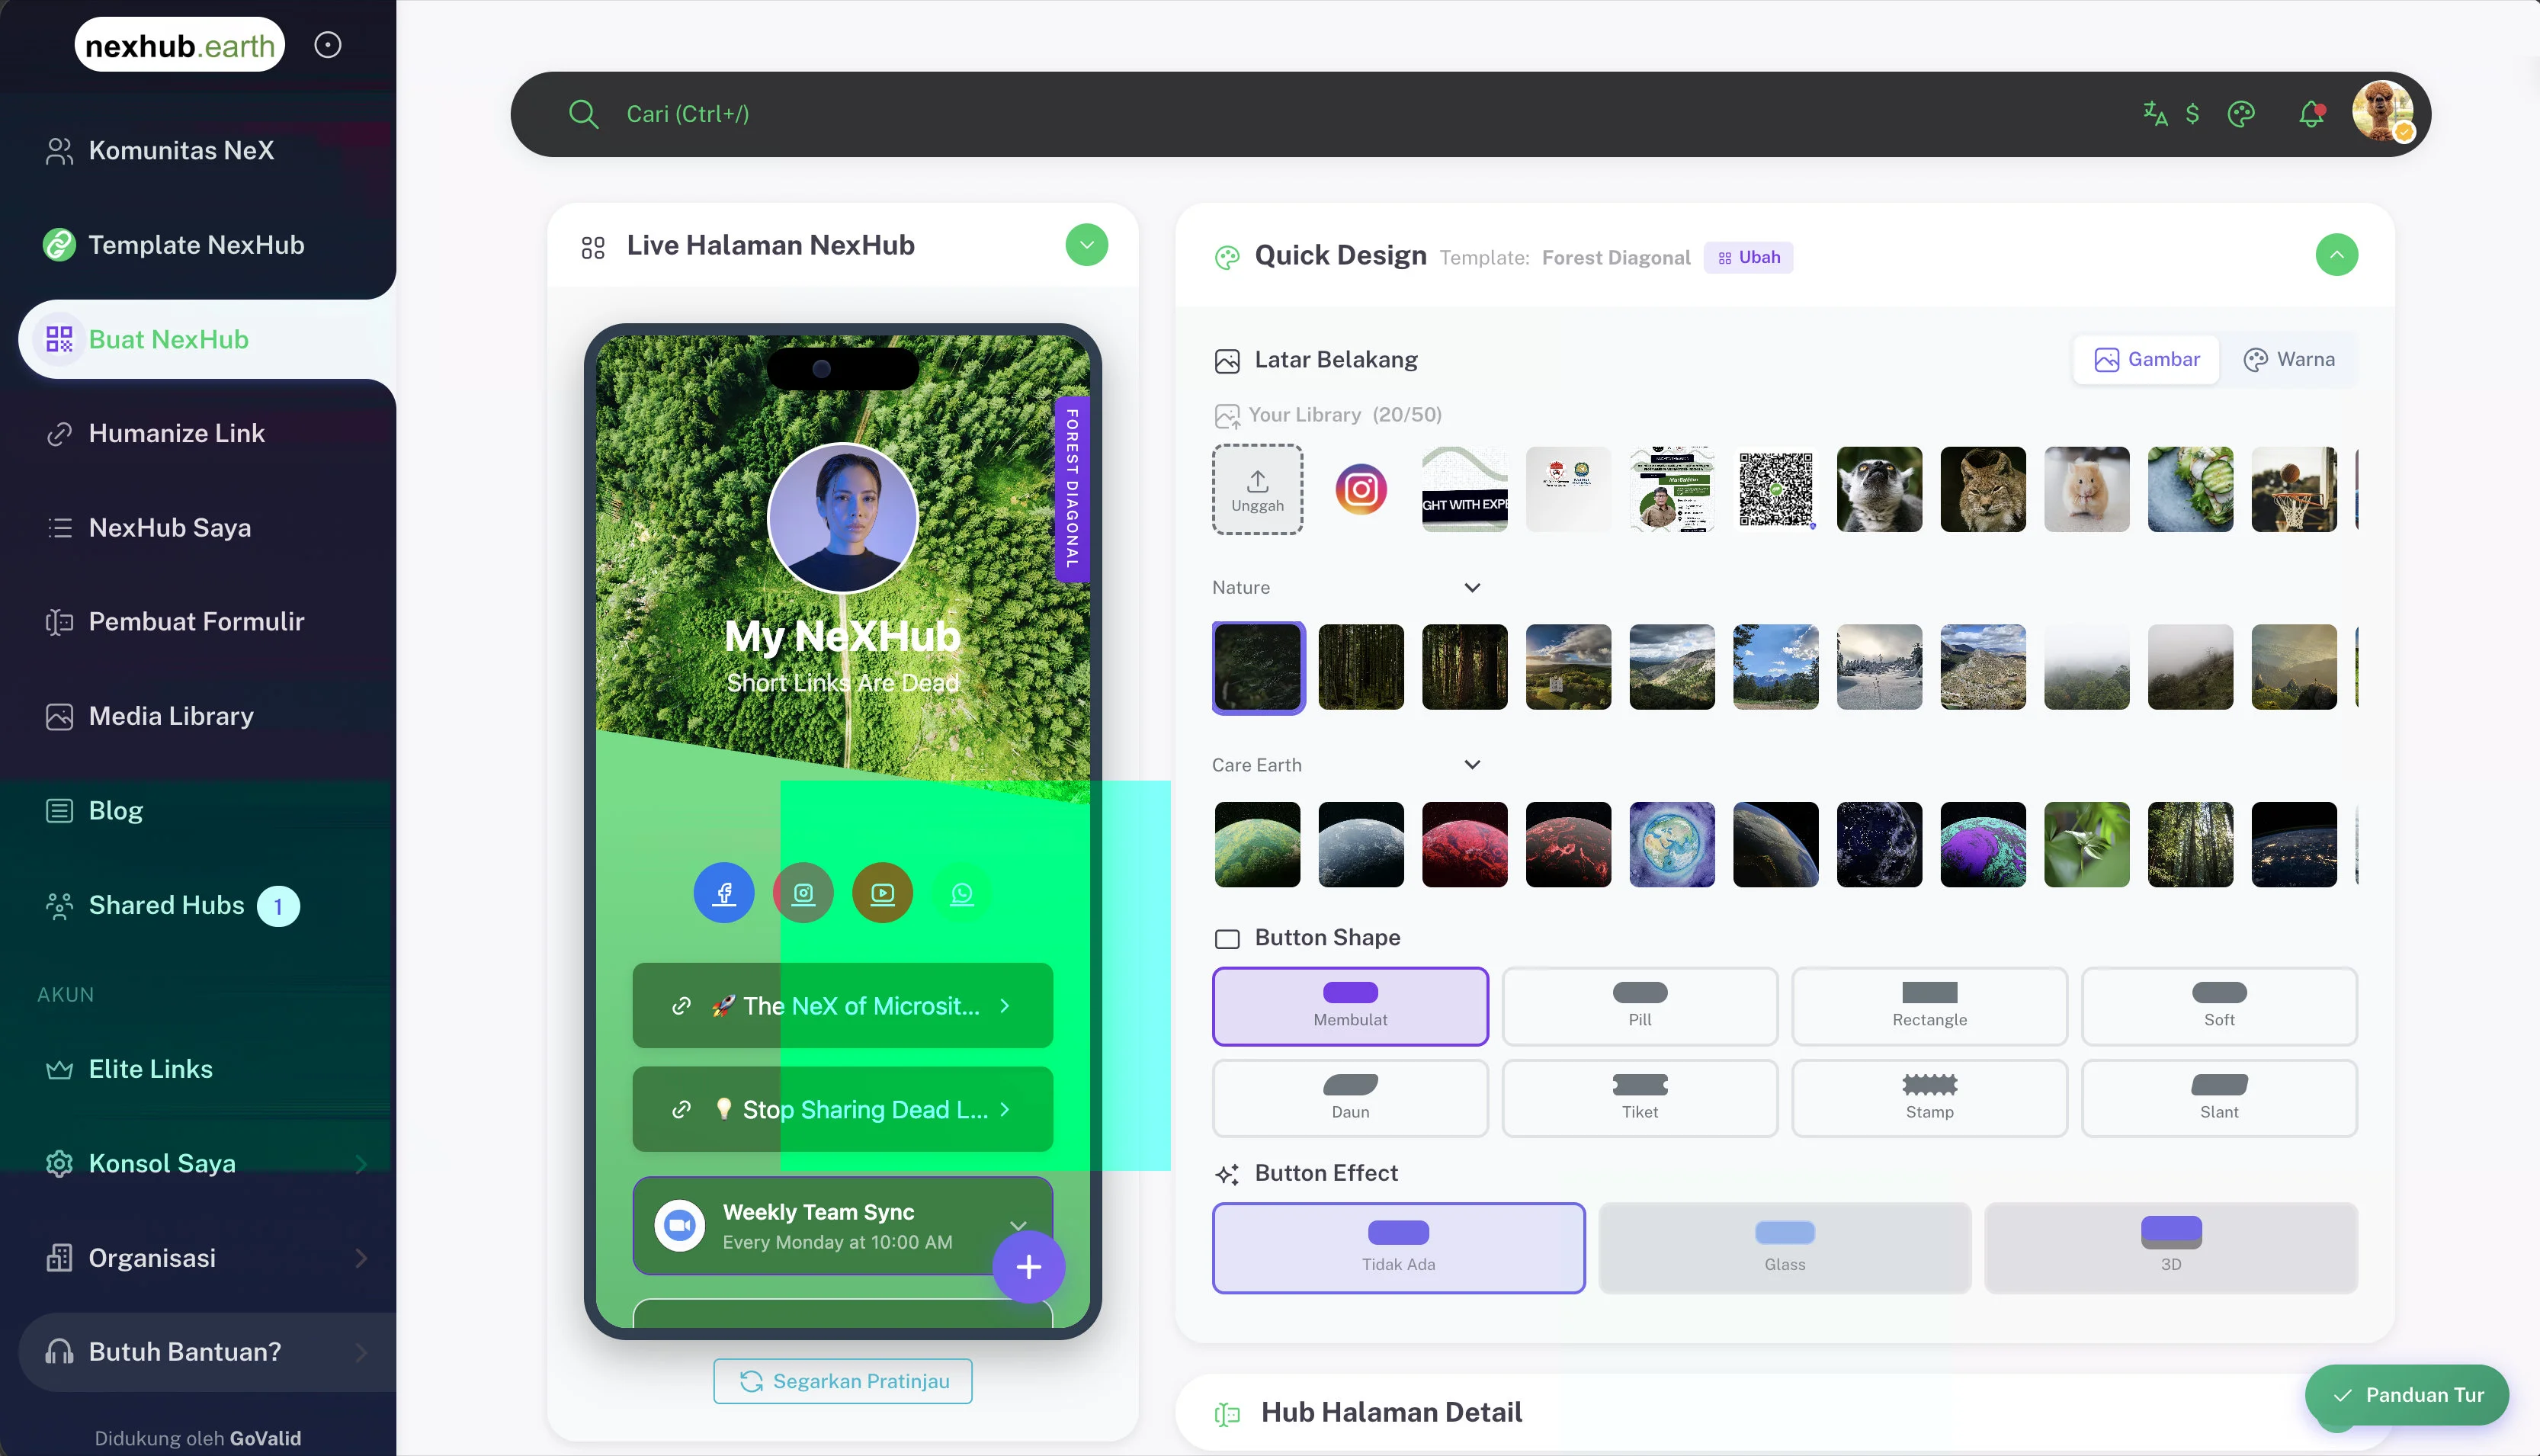
1. Quick Design
The Quick Design panel lets you set the visual style of your hub at a glance.
Template
Shows the currently applied template (e.g. Forest Diagonal). Click Change to switch to a different template at any time.
Background
Choose a background for your hub:
- Image tab — Pick from your media library (up to 50 slots) or browse curated image collections organized by category (Nature, Earth, etc.)
- Color tab — Set a solid color background instead
Button Shape
Select the shape for all link buttons on your hub:
| Shape | Description |
|---|---|
| Rounded | Softly rounded corners (default) |
| Pill | Fully rounded pill shape |
| Rectangle | Sharp square corners |
| Soft | Lightly rounded |
| Down | Angled downward style |
| Ticket | Ticket/stamp cut edges |
| Stamp | Perforated stamp style |
| Stair | Stepped corner style |
Button Effect
Add a visual effect to buttons:
| Effect | Description |
|---|---|
| None | Flat button, no effect |
| Glass | Frosted glass overlay |
| 3D | Raised three-dimensional look |
2. Hub Page Detail
Configure your hub's name, URL slug, and profile photo.
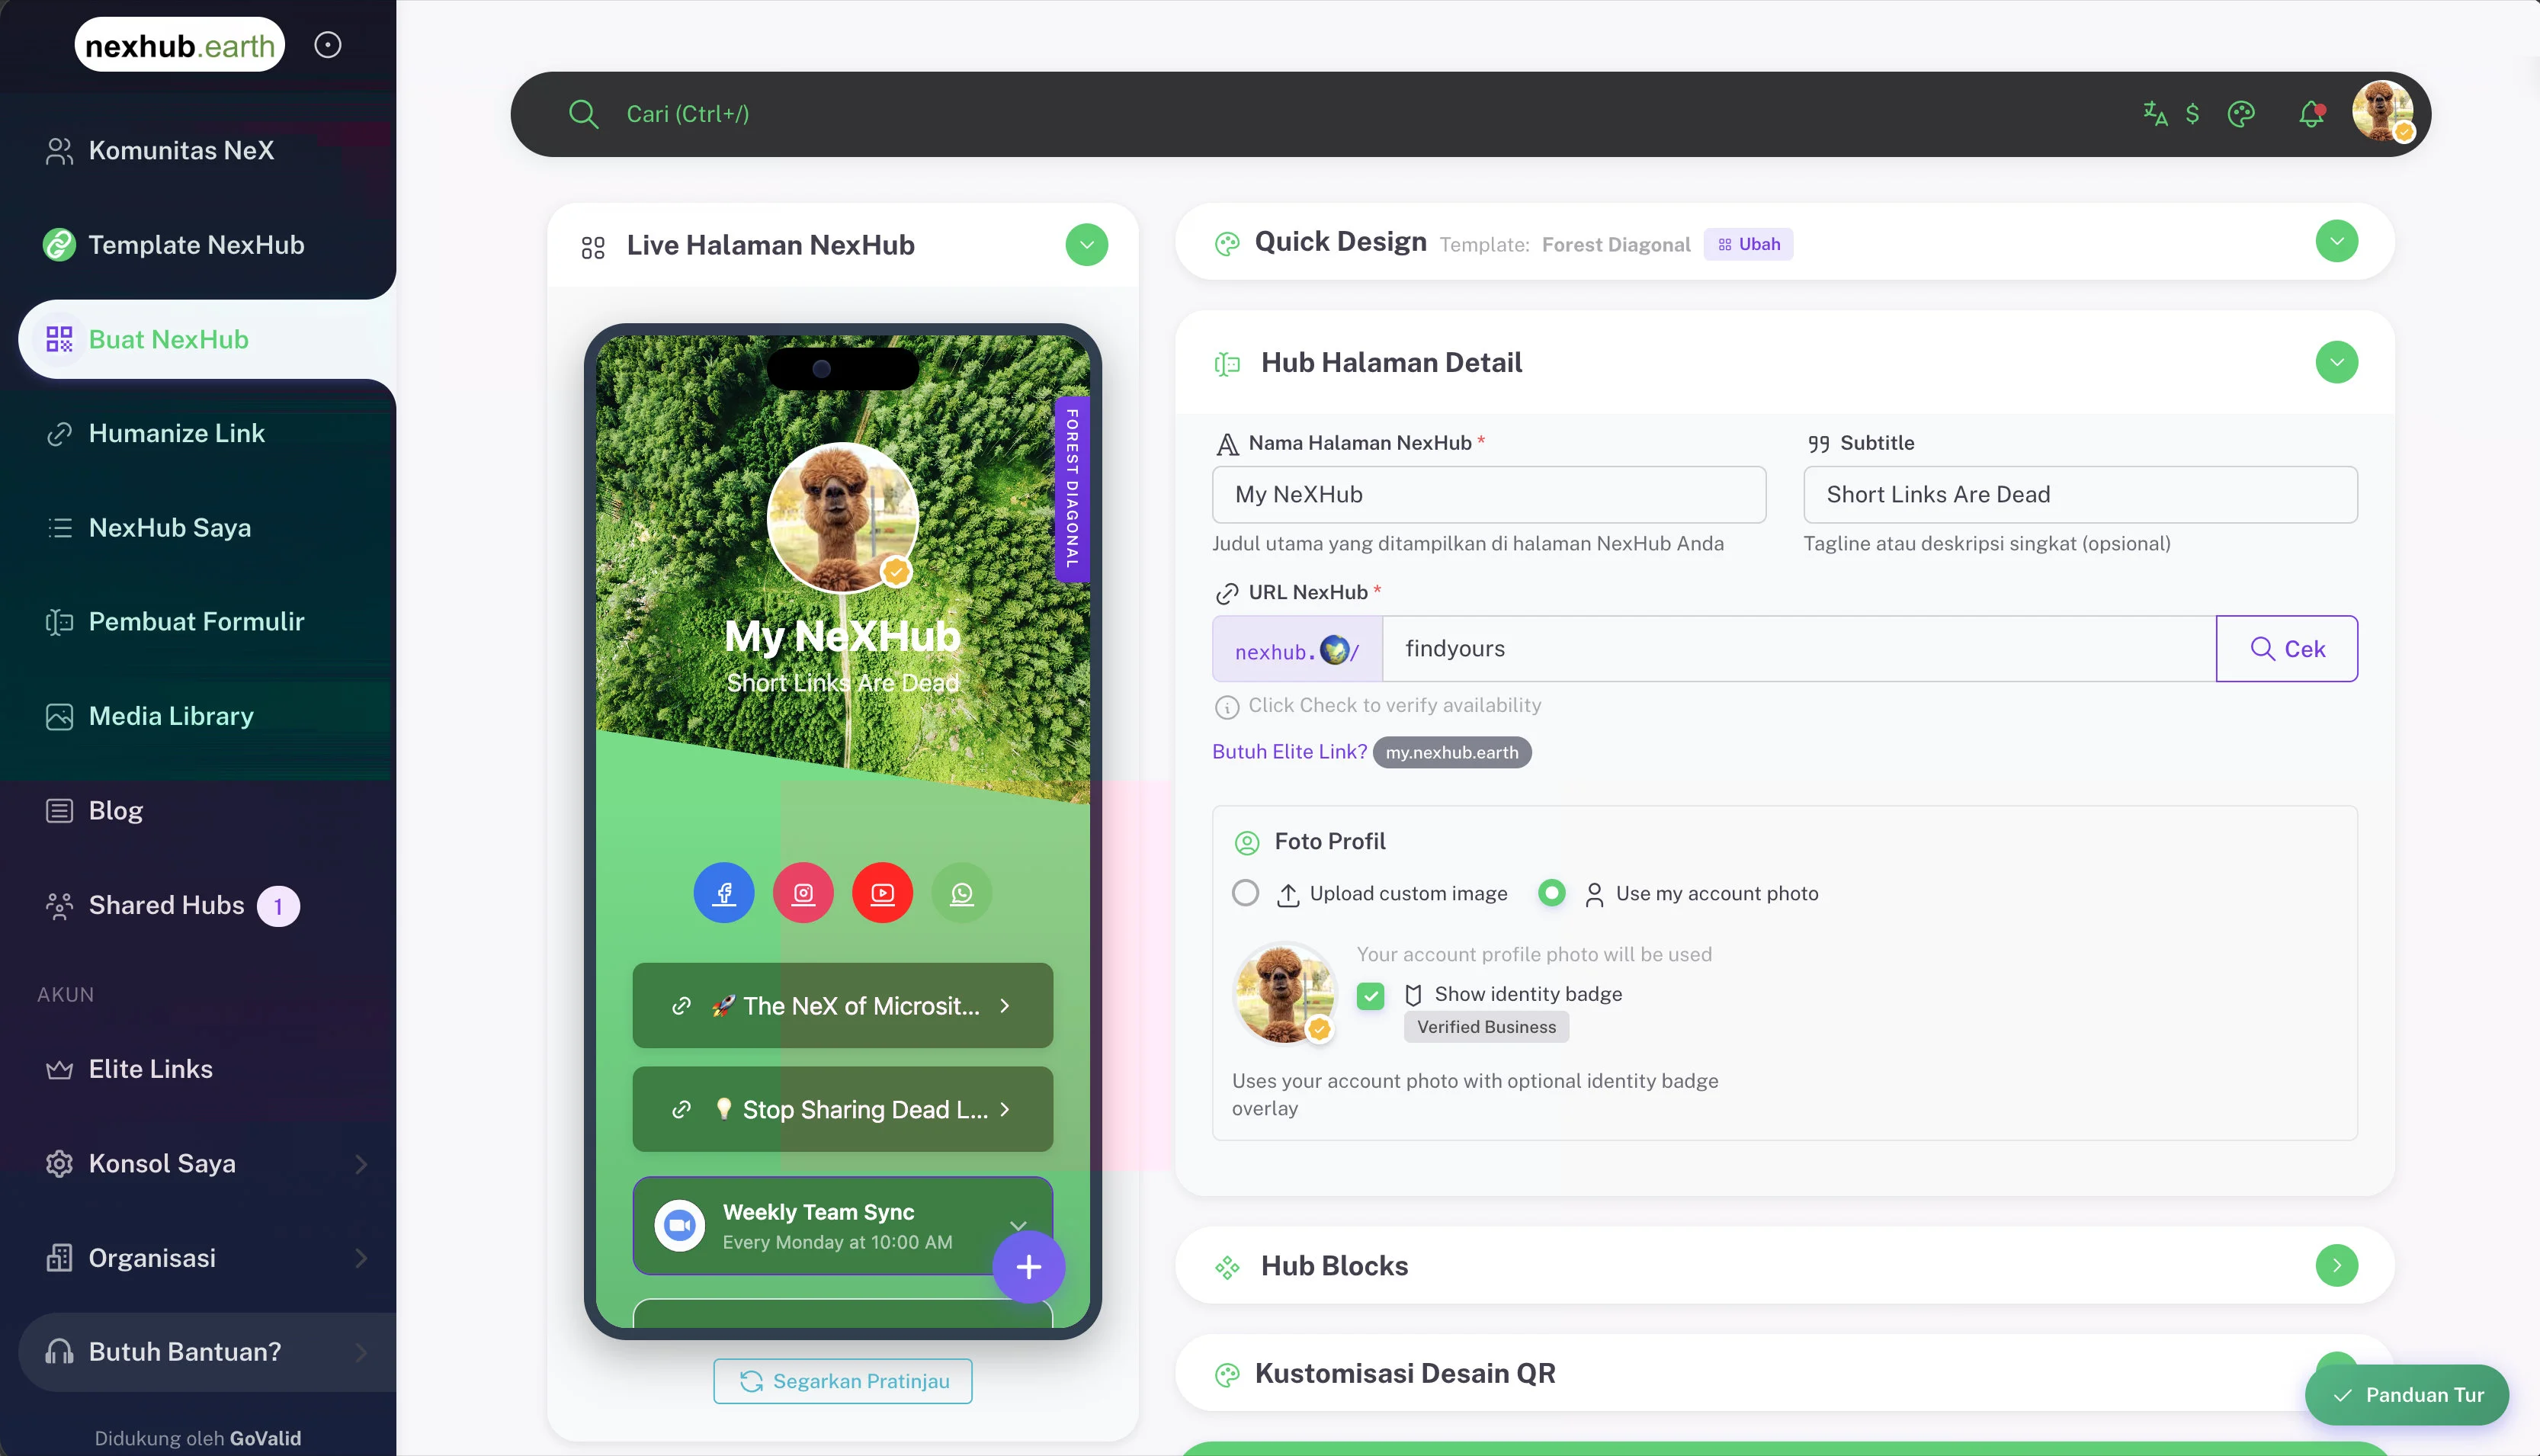
| Field | Description |
|---|---|
| Hub Page Name | Main title displayed on your hub page |
| Subtitle | Short tagline or description (optional) |
| NexHub URL | Custom slug — format: nexhub.earth/your-slug (min. 3 chars, letters/numbers/hyphens) |
| Profile Photo | Upload a custom image, or use your GoValid account photo |
| Show Identity Badge | Overlay your verified identity badge (e.g. Verified Business) on your profile photo |
Click Check next to the URL field to verify slug availability before saving.
Need a custom subdomain? Click Need Elite Link? to set up yourname.nexhub.earth.
3. Hub Blocks
Add and arrange content blocks on your hub. Each hub supports multiple pages — use the Home tab for your main page and + Page to add more.
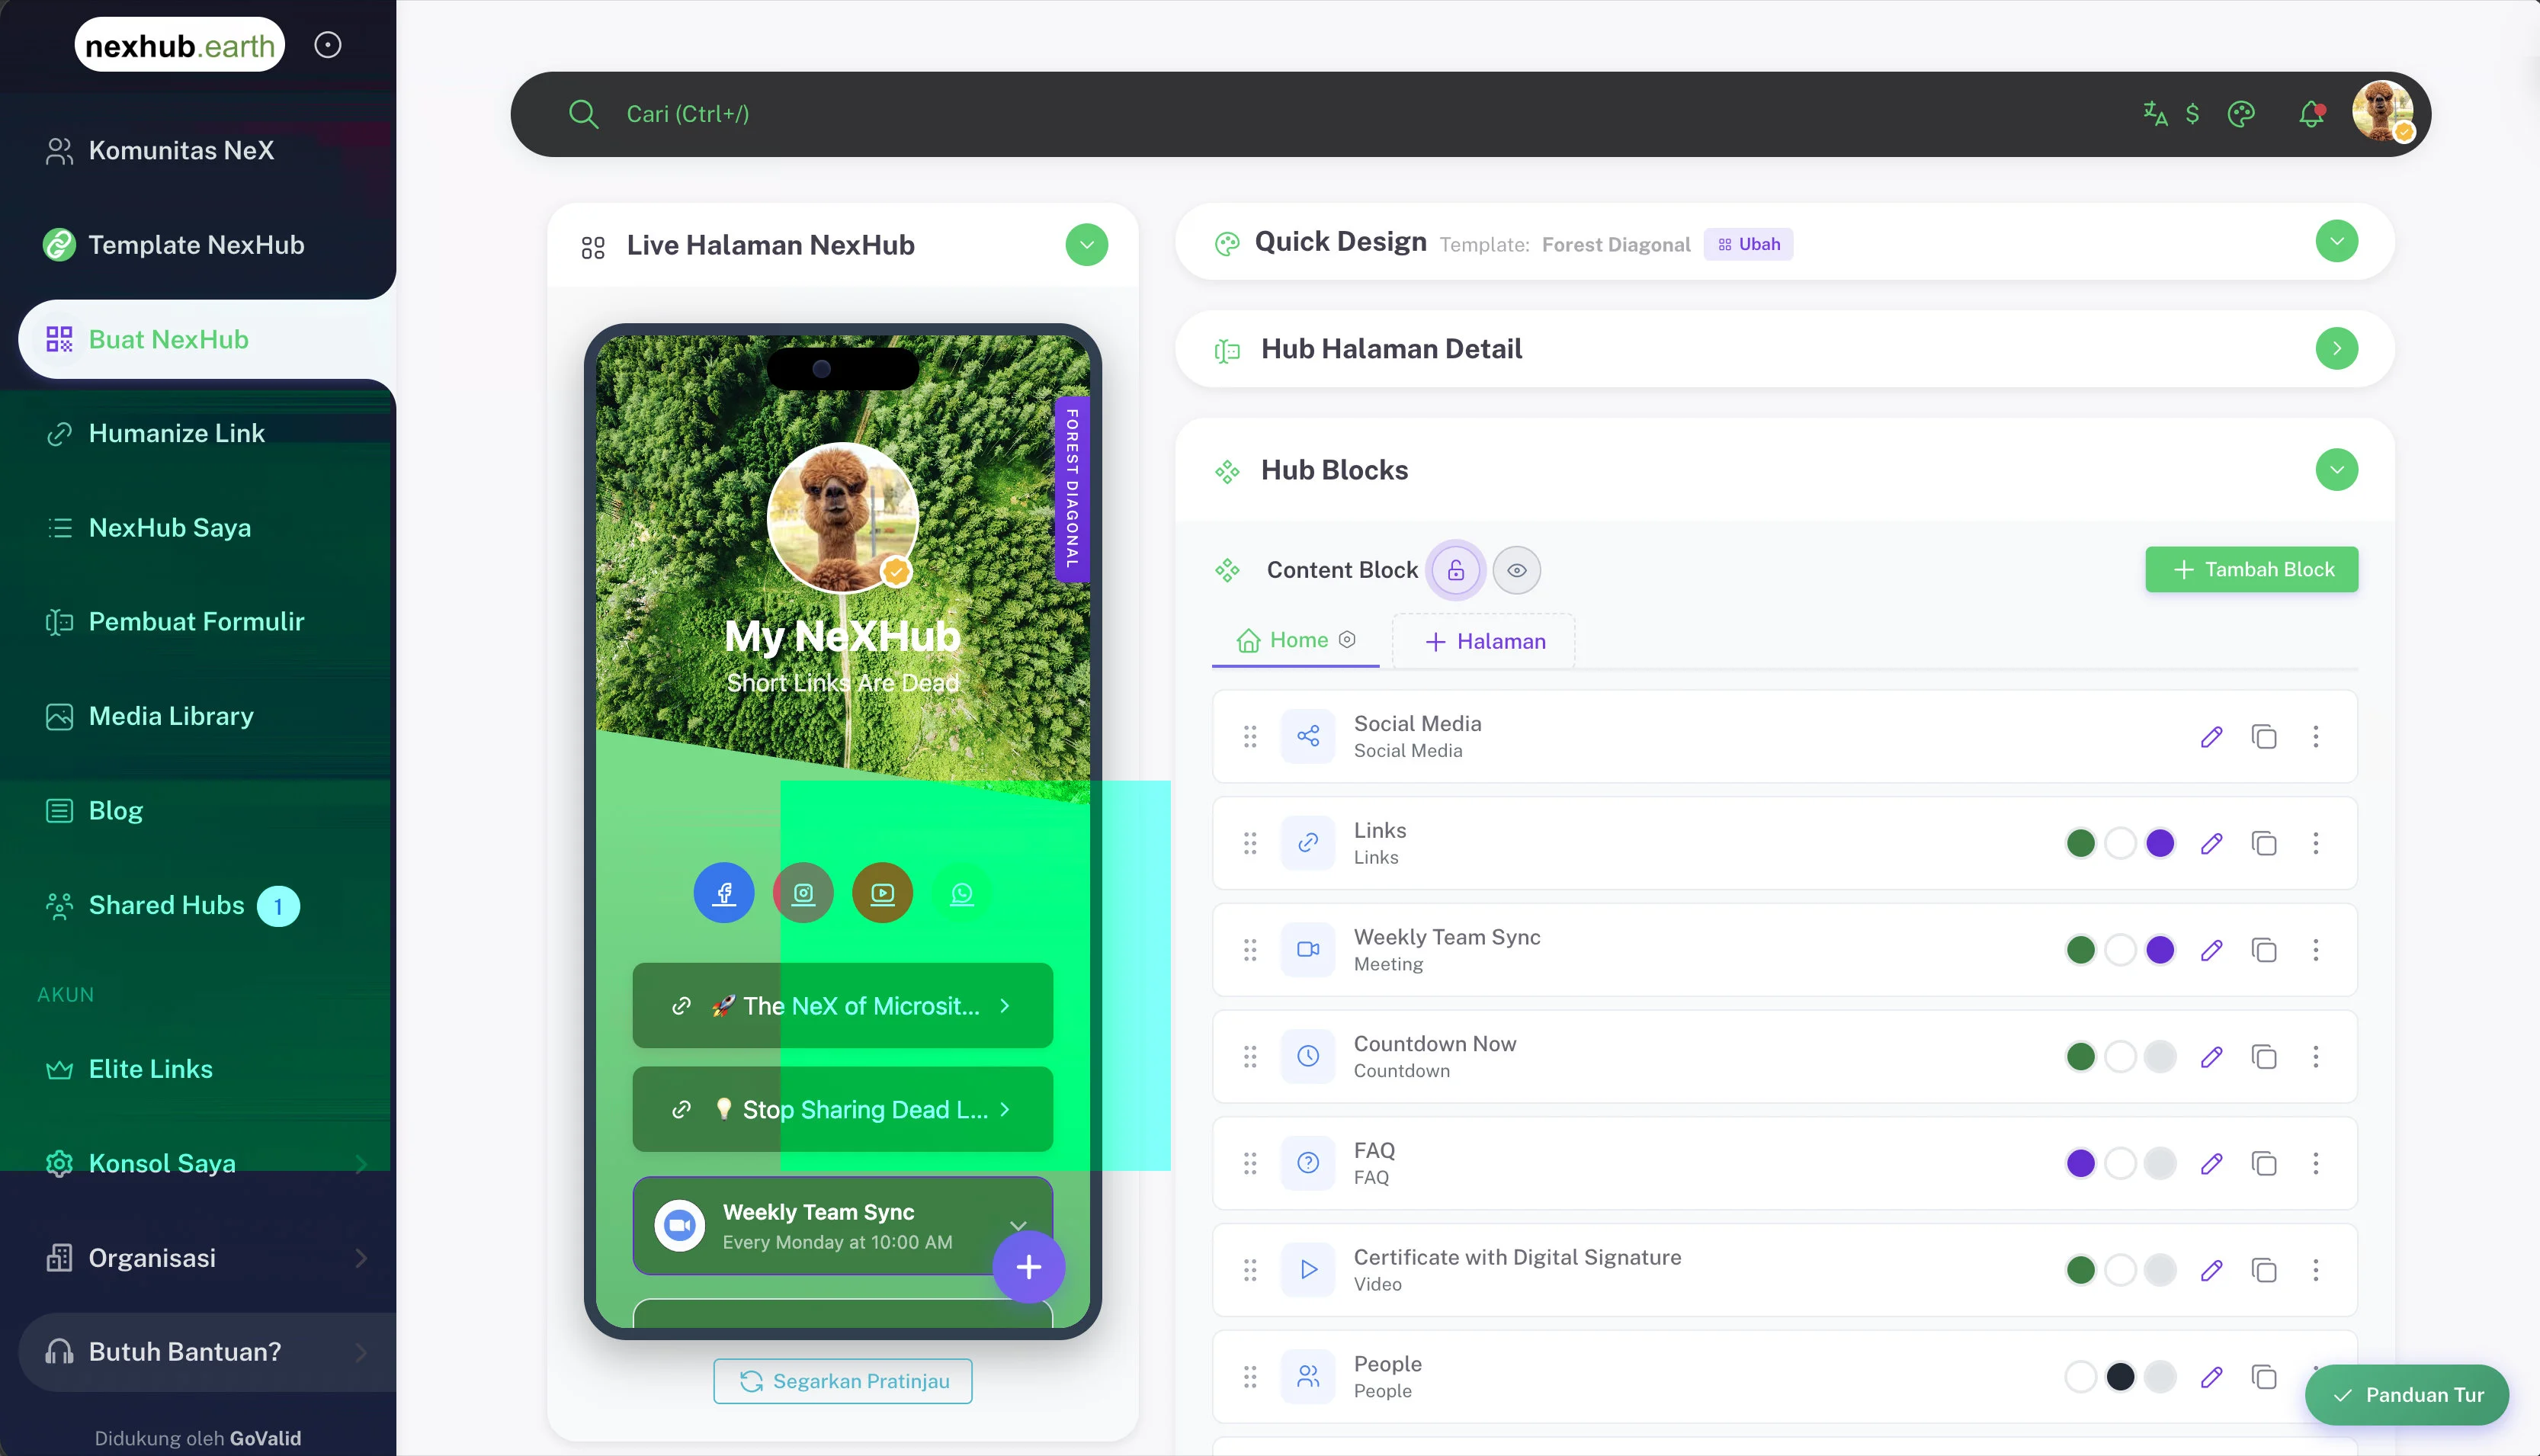
Click + Add Block to open the block picker and choose from 35+ blocks.
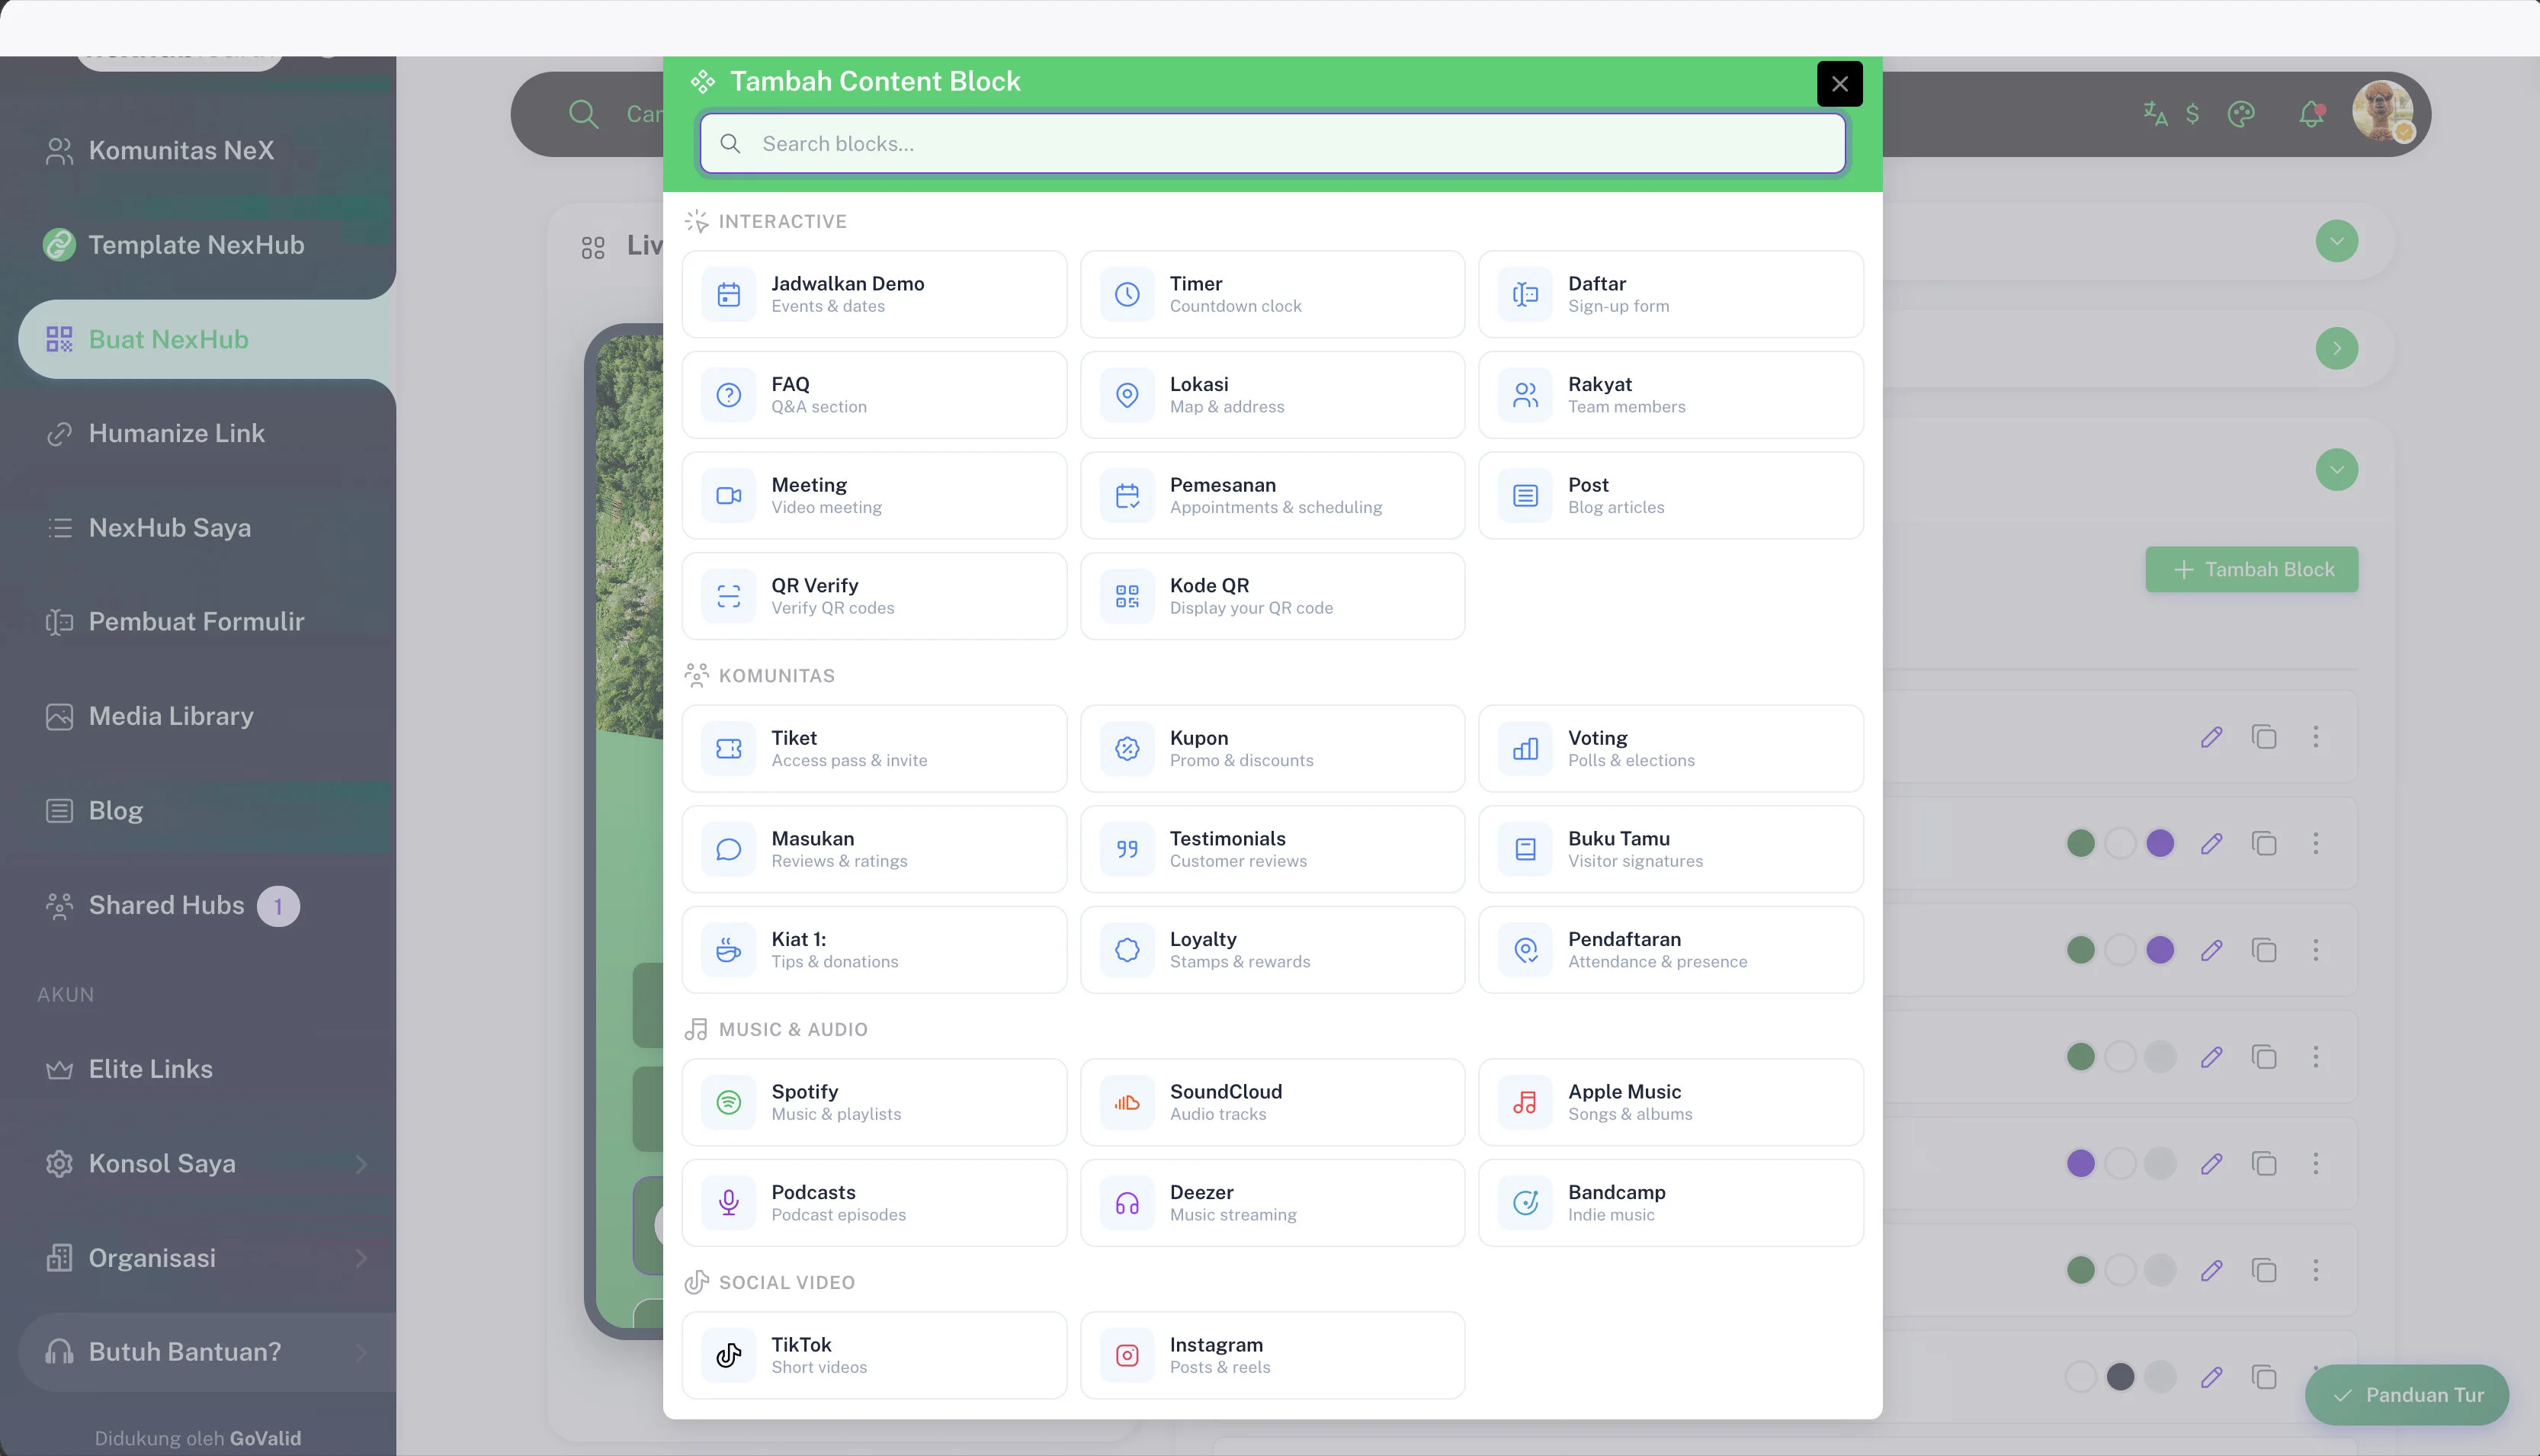
Interactive Blocks
| Block | Description |
|---|---|
| Schedule Demo | Events & dates booking |
| Timer | Countdown clock |
| Sign Up / Register | Sign up form |
| FAQ | Expandable FAQ section |
| Location | Map & address |
| People | Team members display |
| Meeting | Video meeting link |
| Booking | Appointment & scheduling |
| Blog Post | Display blog articles |
| QR Verify | Verify QR codes |
| QR Code Display | Show your QR code |
Community Blocks
| Block | Description |
|---|---|
| Ticket | Access pass & invite |
| Coupon | Promos & discounts |
| Voting | Polls & elections |
| Feedback | Reviews & ratings |
| Testimonials | Customer reviews |
| Guestbook | Visitor signatures |
| Tips / Donations | Tips & donations (Ko-fi, Trakteer, etc.) |
| Loyalty | Stamps & rewards |
| Registration | Attendance & presence tracking |
Music & Audio Blocks
| Block | Description |
|---|---|
| Spotify | Music & playlists |
| SoundCloud | Audio tracks |
| Apple Music | Songs & albums |
| Podcasts | Podcast episodes |
| Deezer | Music streaming |
| Bandcamp | Indie music |
Social Video Blocks
| Block | Description |
|---|---|
| TikTok | Short videos |
| Posts & reels |
Each block in the list can be reordered via drag-and-drop, toggled on/off, edited, or duplicated using the action icons.
4. QR Design Customization
Customize the visual appearance of the QR code generated for your hub.
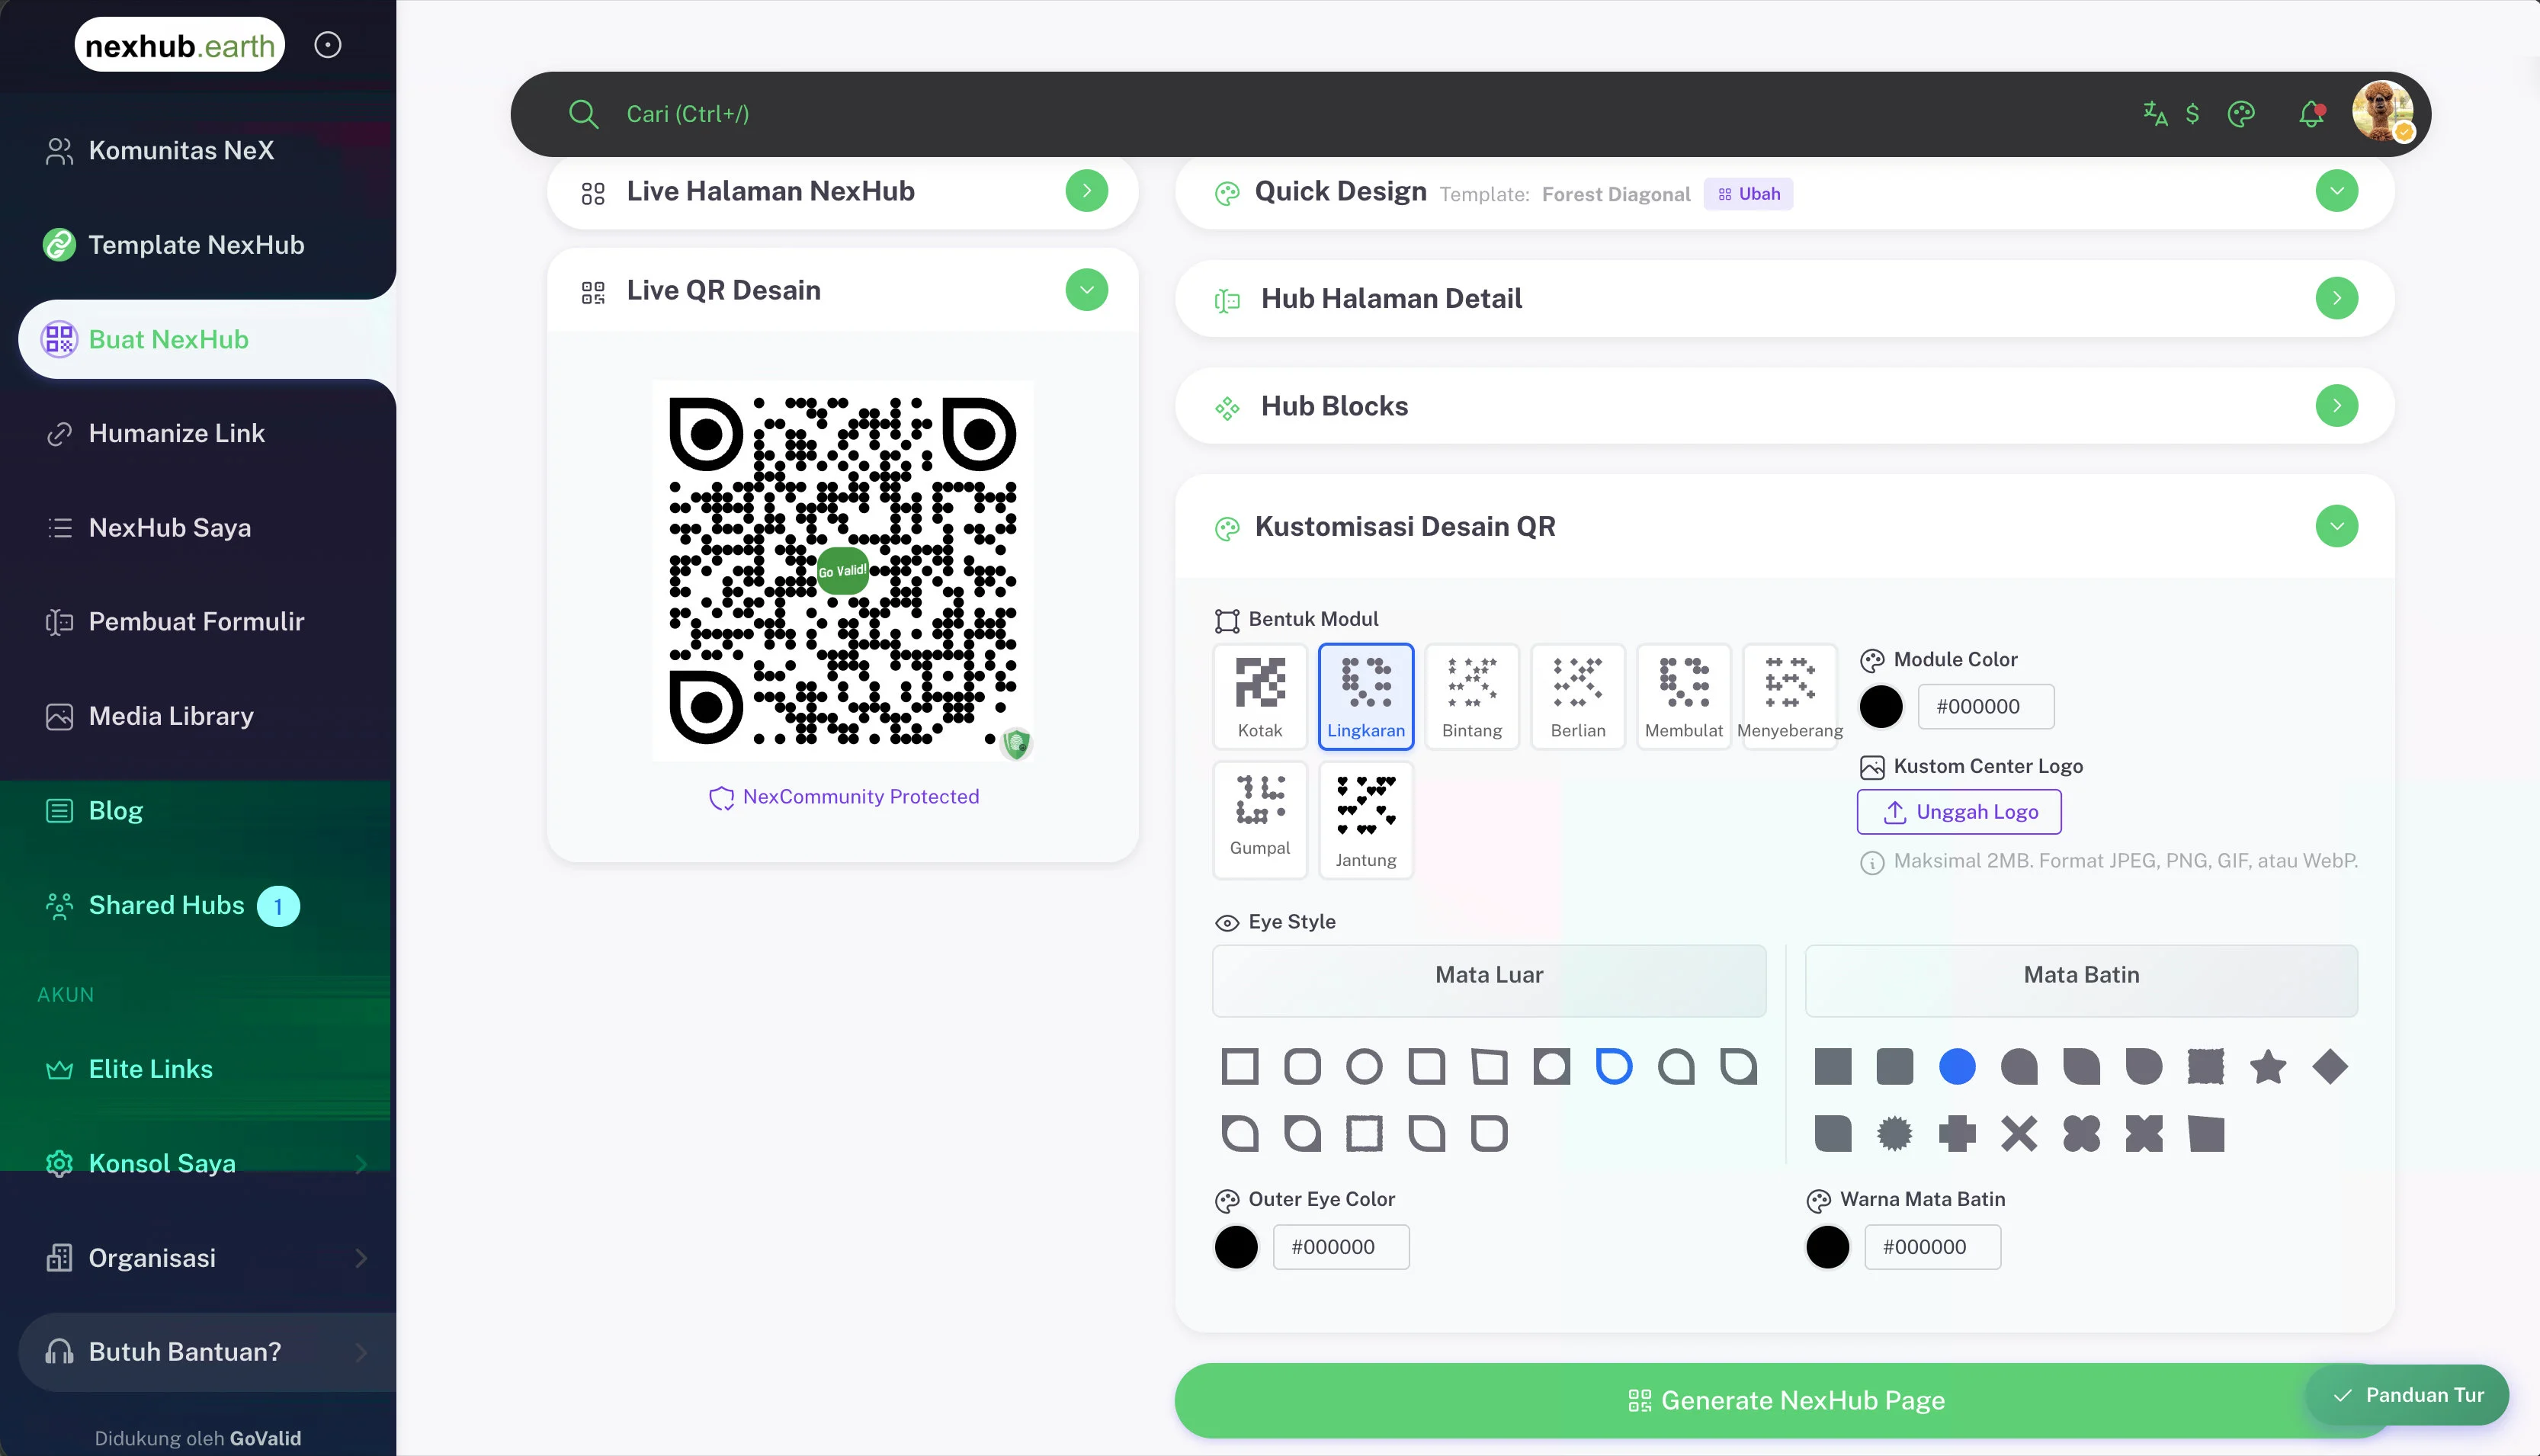
Module Shape
Choose the shape of the individual QR dots:
| Shape | |
|---|---|
| Box | Circle |
| Star | Diamond |
| Rounded | Cross |
Module Color
Set the color of the QR modules (default: #000000).
Custom Center Logo
Upload a logo to display in the center of the QR code:
- Max 2MB
- Supported formats: JPEG, PNG, GIF, WebP
Eye Style
Independently style the Outer Eye (the three corner squares) and Inner Eye (the inner dot of each corner). Each has a wide selection of shapes.
Eye Colors
Set separate colors for Outer Eye Color and Inner Eye Color.
All NexHub QR codes display a NexCommunity Protected badge, indicating the QR is verified and tamper-evident.
Generate NexHub Page
Once all four sections are configured, click the Generate NexHub Page button to publish your hub and make it live.
Hub Privacy & Visibility
| Setting | Description |
|---|---|
| Public | Anyone can view your hub |
| Private | Only owner and allowed viewers can access |
| Password Protected | Per-page password protection |
| Content Password | Protect content blocks while keeping header/footer visible |
Hub Slug & URL
Each hub gets a unique URL slug:
- Format:
nexhub.earth/your-slug - Characters: letters, numbers, underscores, hyphens
- Minimum length: 3 characters
- Mirror:
linkhub.earth/your-slug
Humanize Link
Create memorable, AI-generated short URLs that redirect to any destination.
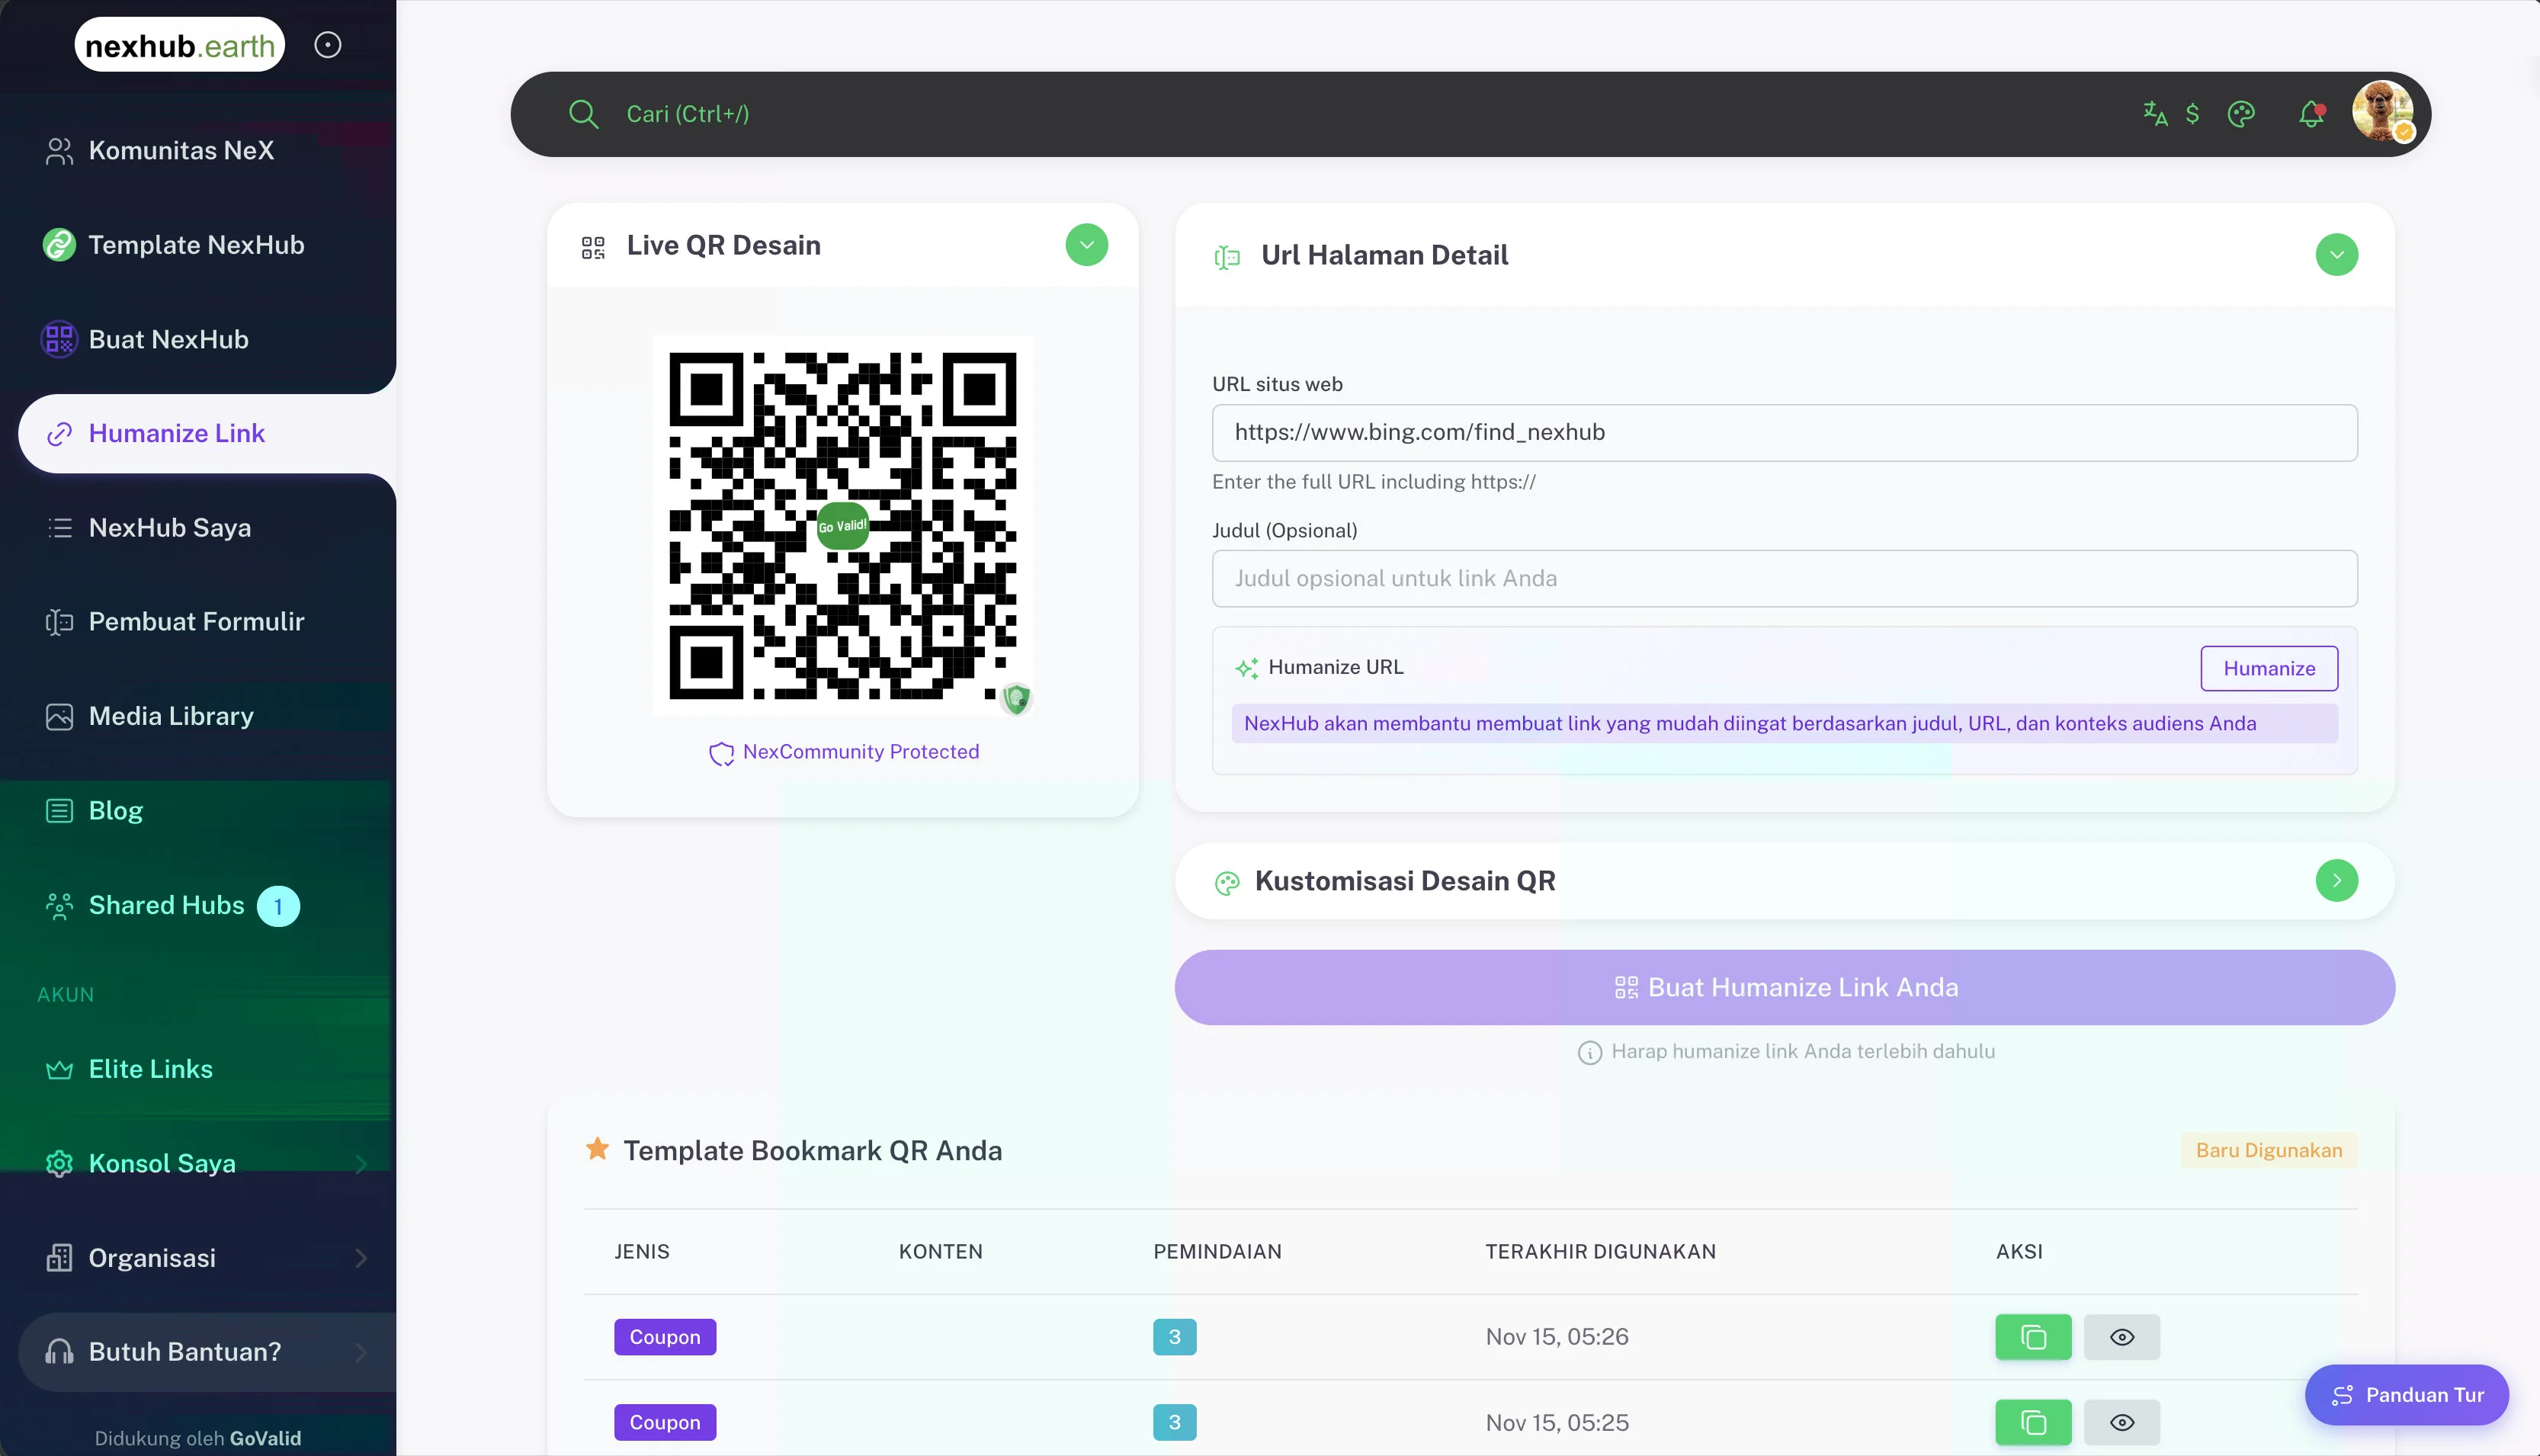
How It Works
- Navigate to Humanize Link from the sidebar
- Enter your destination URL (full URL including
https://) - Optionally add a Title to give the AI more context
- Click Humanize — NexHub AI generates slug suggestions based on your title, URL, and audience context
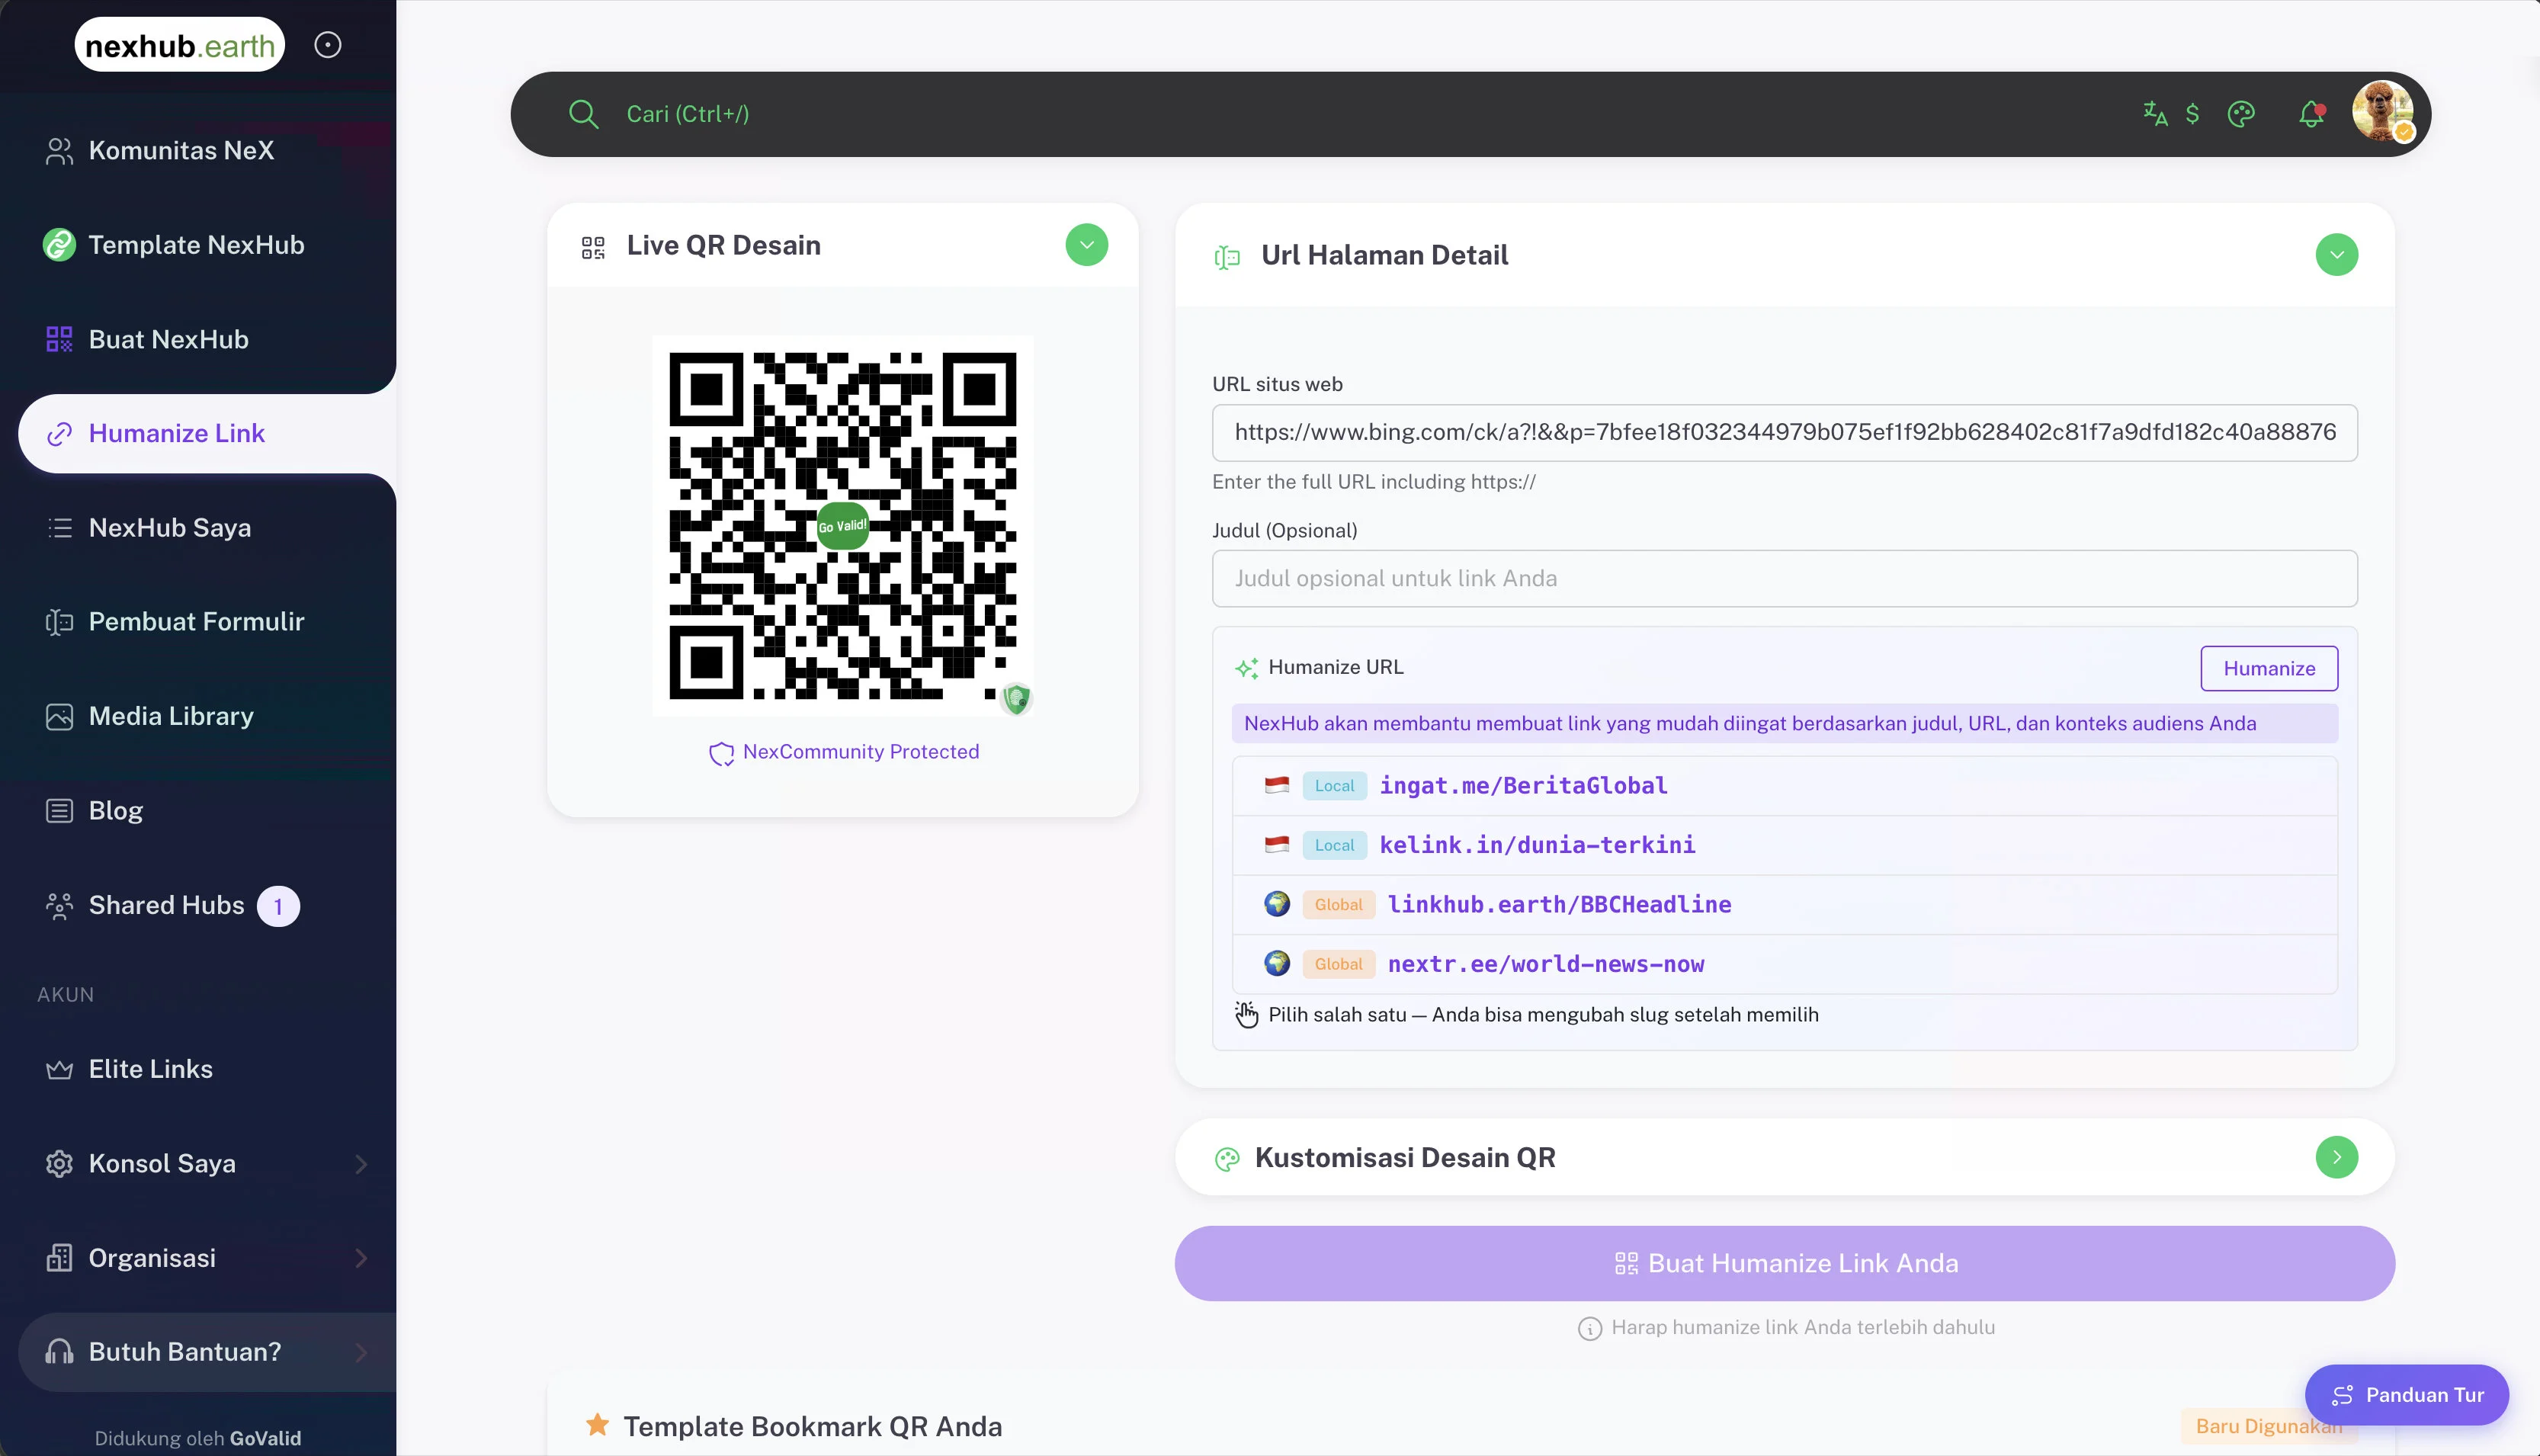
AI Slug Suggestions
After clicking Humanize, NexHub presents multiple slug options:
| Type | Example | Description |
|---|---|---|
| Local | ingat.me/BeritaGlobal | Short domains optimized for local audiences |
| Local | kelink.in/dunia-terkini | Alternative local option |
| Global | linkhub.earth/BBCheadline | Standard global linkhub domain |
| Global | nextr.ee/world-news-now | Alternative global option |
Pick one — you can edit the slug after selecting. Once a slug is chosen, click Create Your Humanize Link to generate the link and its QR code.
Features
- AI-generated slug suggestions (Local and Global options)
- Redirect tracking and scan analytics
- QR code generated automatically for each link
- NexCommunity trust layer for authenticated users
- Template Bookmark — reuse recently used QR templates
My NexHub
View and manage all your hubs and QR codes in one place.
Features
- List view of all your created hubs and QR codes
- Scan count and analytics for each item
- Edit, duplicate, or delete existing hubs
- Bookmark favorite hubs as templates (max 15 per user)
- Filter by QR type, trust level, or status
- Export QR code images
Hub Actions
| Action | Description |
|---|---|
| Edit | Open the hub in the block editor |
| Preview | View the live hub page |
| Duplicate | Create a copy as a starting point |
| Delete | Remove the hub permanently |
| Download QR | Save the QR code image |
Form Builder
Create and manage custom registration forms for events, webinars, and more.
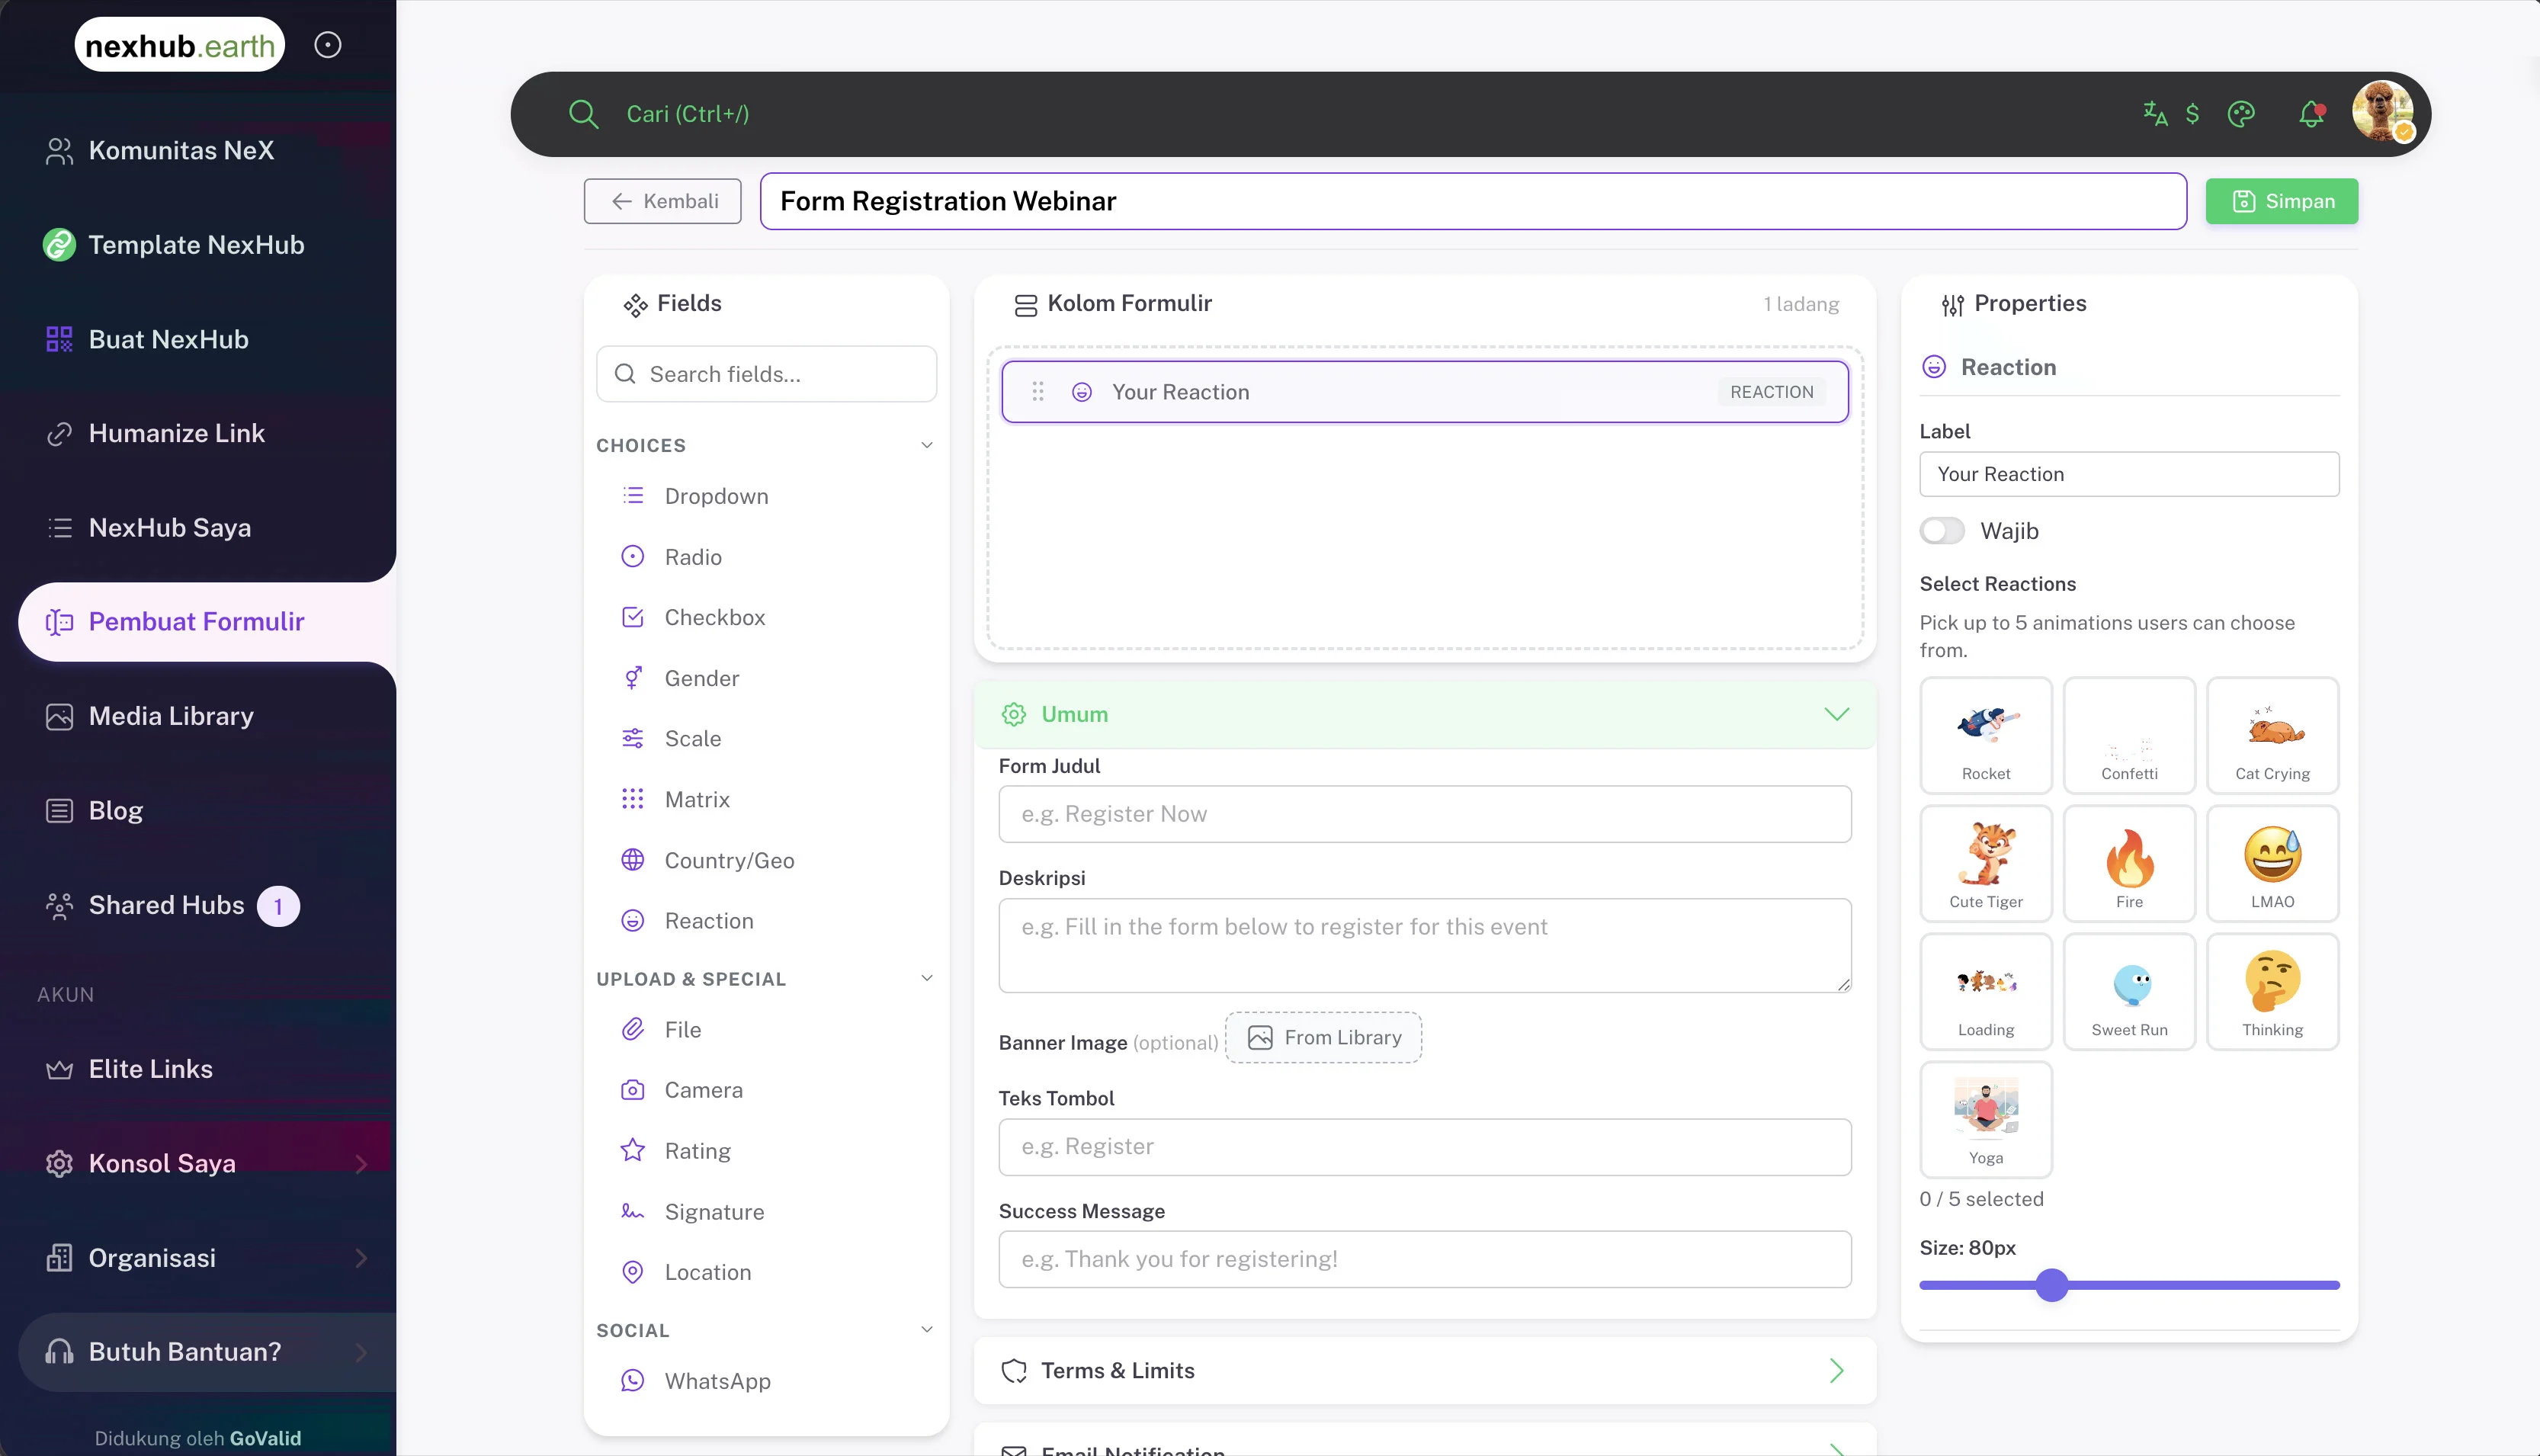
Form Settings
Each form has general settings:
| Field | Description |
|---|---|
| Form Title | Displayed at the top of the form |
| Description | Instructions or context for respondents |
| Banner Image | Optional header image (select from Media Library) |
| Button Text | Label for the submit button (e.g. "Register") |
| Success Message | Message shown after successful submission |
| Terms & Limits | Set submission limits or terms of service |
| Email Notification | Configure email alerts for new submissions |
Form Field Types
Fields are organized into categories:
Choices
| Field | Description |
|---|---|
| Dropdown | Select from predefined options |
| Radio | Single choice selection |
| Checkbox | Multiple choice selection |
| Gender | Gender selection field |
| Scale | Rating scale (e.g. 1–5 or 1–10) |
| Matrix | Grid-style rating or ranking |
| Country/Geo | Country or region picker |
| Reaction | Animated reaction picker (up to 5 reactions, configurable size) |
Upload & Special
| Field | Description |
|---|---|
| File | File attachment upload |
| Camera | Camera capture input |
| Rating | Star rating input |
| Signature | Digital signature pad |
| Location | GPS location capture |
Text & Standard
| Field | Description |
|---|---|
| Text | Single-line text input |
| Textarea | Multi-line text input |
| Email address with validation | |
| Phone | Phone number input |
| Date | Date picker |
| Number | Numeric input |
Social
| Field | Description |
|---|---|
| WhatsApp number or link |
Managing Forms
- Navigate to Form Builder from the sidebar
- Create a new form or edit an existing one
- Drag fields from the left panel into the form canvas
- Configure each field's properties in the right panel (label, required toggle, options)
- Set form status (active/closed)
- Link the form to a hub's registration block
- View and export submissions
Media Library
Upload and manage images and documents for use across your hubs.
Features
- Upload images (JPG, PNG, GIF, WebP) and documents (PDF, DOC, XLS, PPT)
- Browse by tab: All, Images, Documents
- Search by filename or title
- File type auto-detection
- Access tokens for secure file serving
- Integration with hub block editor for image selection
Storage Limits
Storage limits vary by subscription plan.
How to Use
- Navigate to Media Library from the sidebar
- Upload files via drag-and-drop or file picker
- Browse, search, and manage your files
- Use files in hub blocks by selecting from the library
Blog
Create and manage blog posts that can be displayed within your NexHub pages.
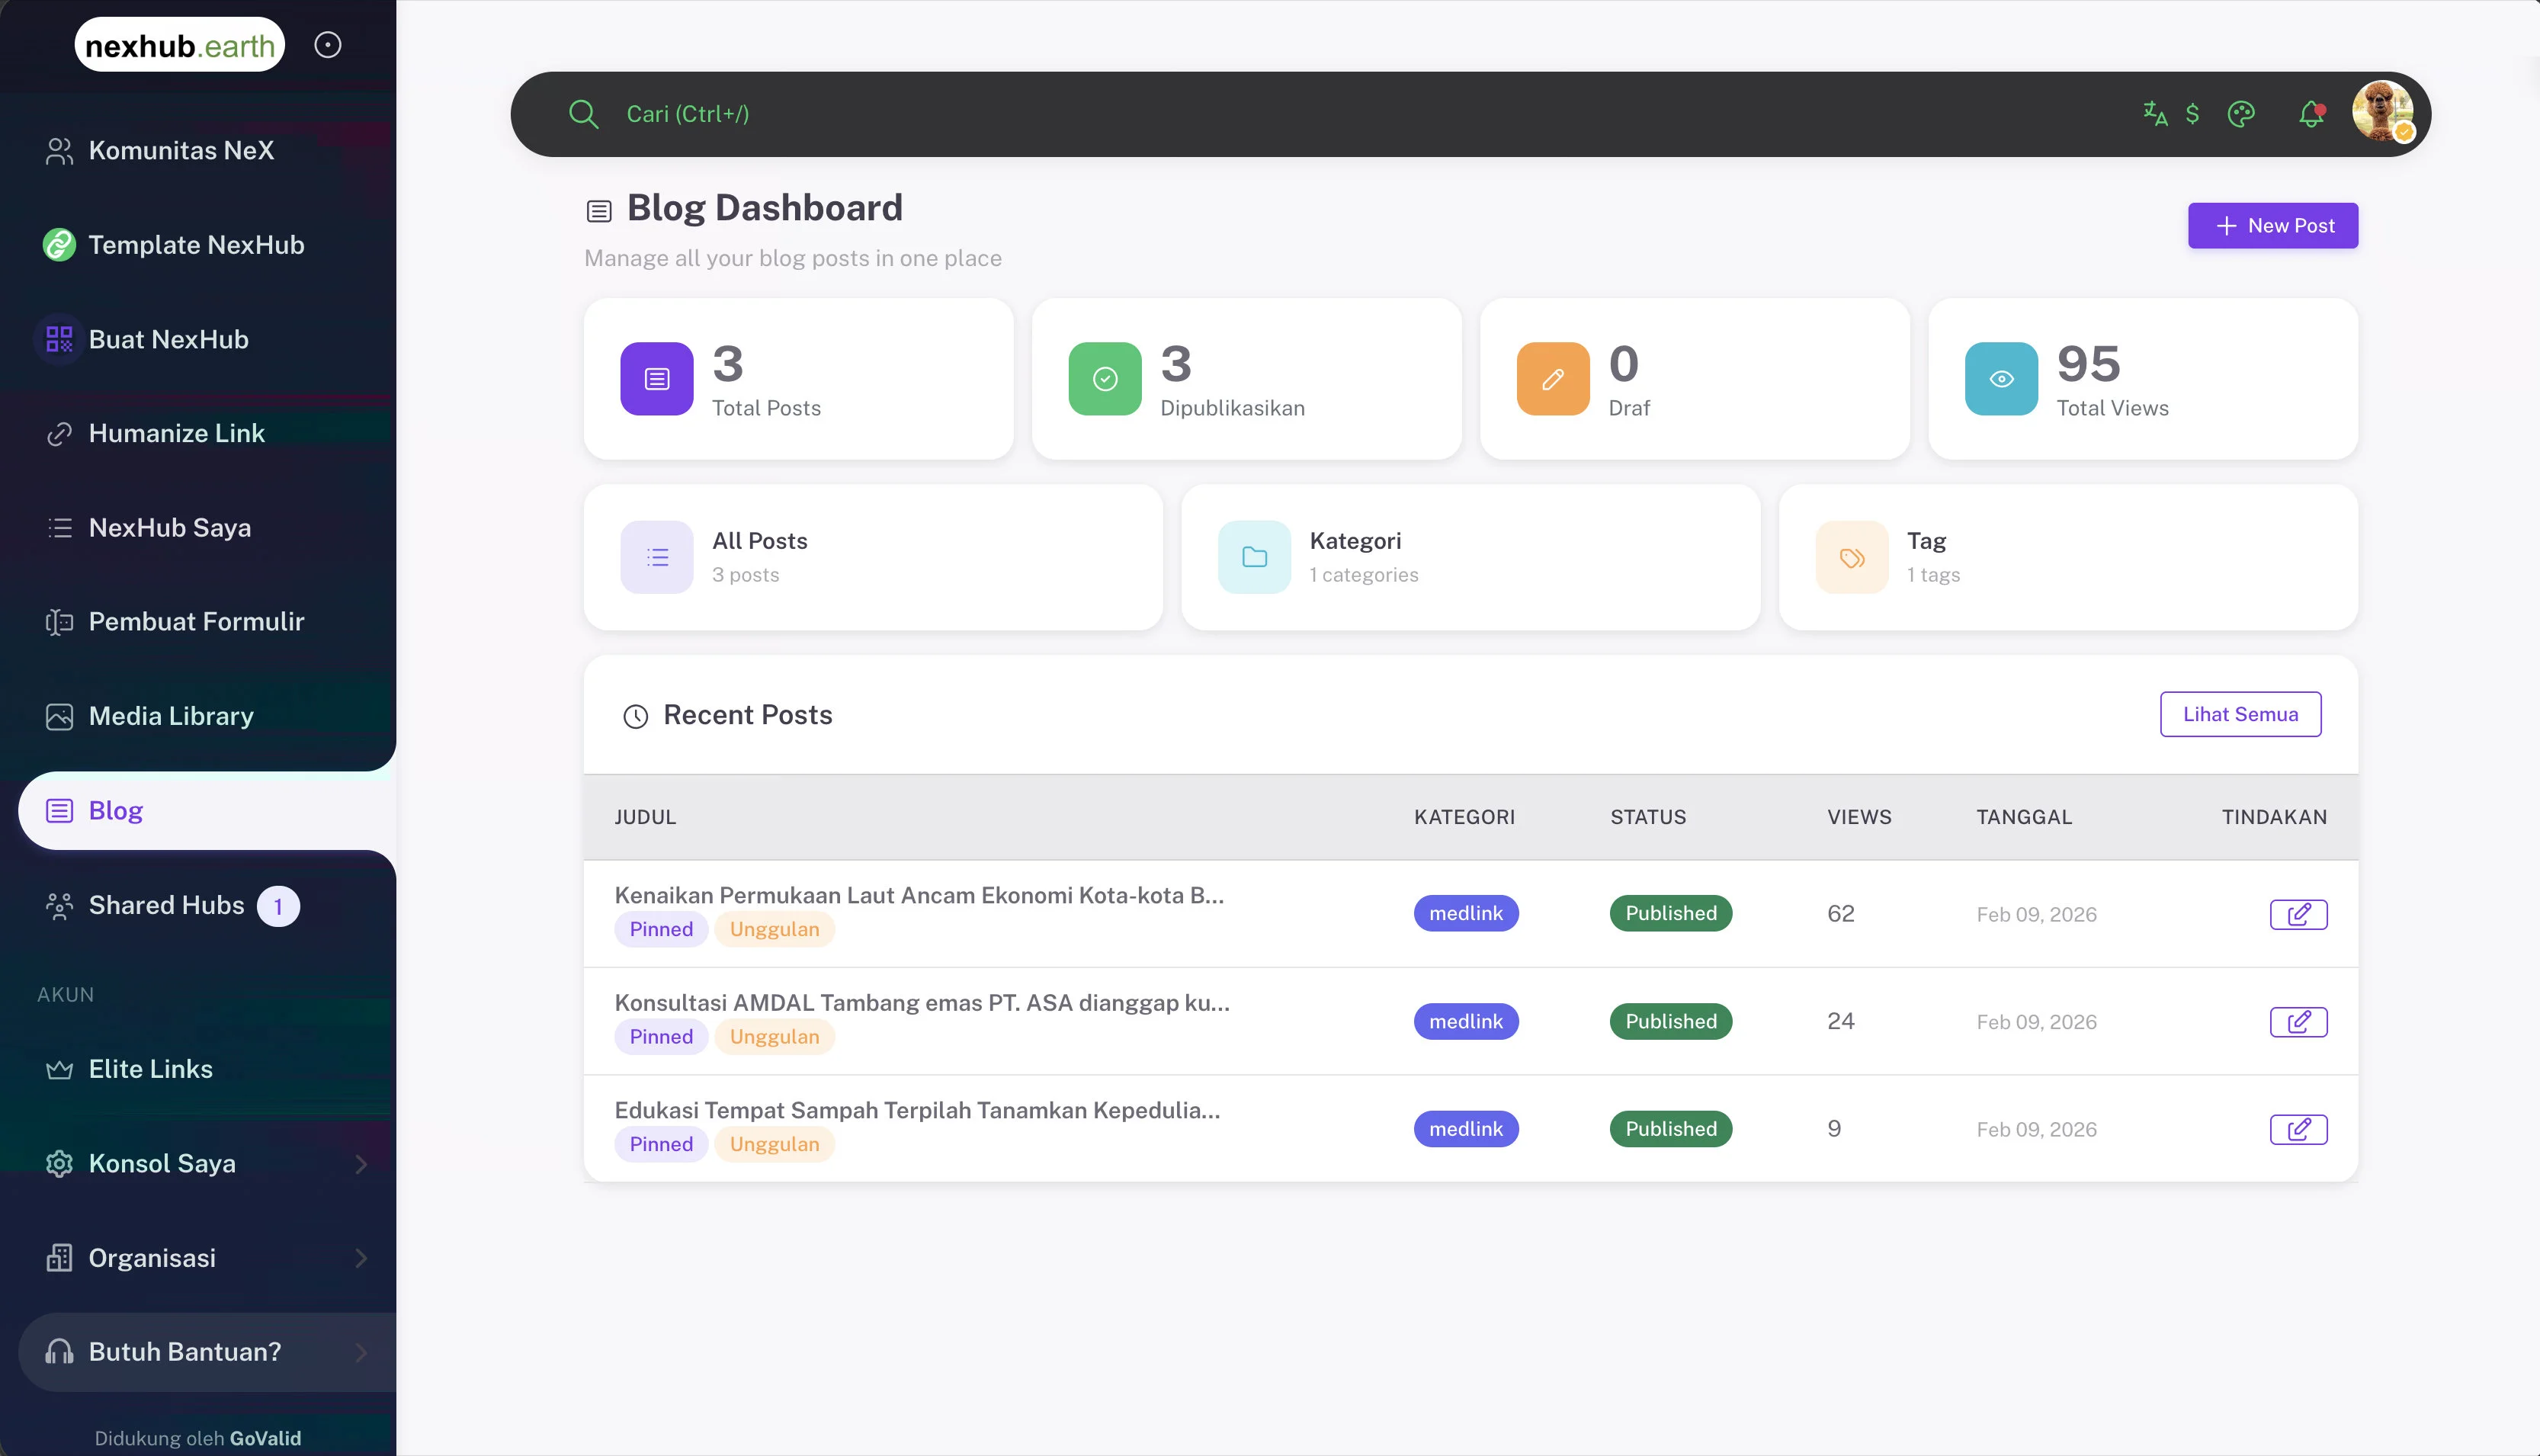
Blog Dashboard
The blog dashboard provides at-a-glance stats and management:
| Card | Description |
|---|---|
| Total Posts | All blog posts across drafts and published |
| Published | Live, publicly visible posts |
| Draft | Unpublished posts in progress |
| Total Views | Cumulative view count across all posts |
Quick access cards link to All Posts, Categories, and Tags management.
The Recent Posts table shows each post's title, category, status (Published/Draft), view count, date, and edit action. Posts can be marked as Pinned and Featured.
Features
- Rich text editor with formatting options
- Blog post categories and tags
- Featured image upload
- Draft and published status
- Pinned and Featured post flags
- View count tracking
- SEO optimization (meta title, description)
Managing Posts
| Action | Description |
|---|---|
| Write | Create a new blog post |
| Edit | Modify an existing post |
| Publish | Make a draft post live |
| Unpublish | Revert to draft status |
| Delete | Remove a post permanently |
Displaying Blog in Hub
Add a Blog Post block to your hub to display your latest articles. Visitors can read posts directly within your hub.
Shared Hubs
Manage hubs you've been invited to collaborate on.
Collaboration Roles
| Role | Permissions |
|---|---|
| Viewer | Read-only access to hub content and dashboards |
| Editor | Can moderate and export data from block dashboards |
How Collaboration Works
- Hub owner invites collaborators via email
- Invited user receives an invitation link
- Upon accepting, the hub appears in Shared Hubs
- Collaborators can access block dashboards (feedback, registrations, etc.) based on their role
Elite Links
Get a custom subdomain for a professional appearance.
Features
- Custom subdomain:
yourname.linkhub.earth - Link your custom subdomain to any hub
- Content password protection for Elite Link pages
- Status pages for unconfigured, expired, or unavailable links
Setup
- Navigate to Elite Links from the sidebar
- Configure your desired subdomain
- Link it to an existing hub
- Manage content passwords and visibility
Getting Started
Quick Start
- Log in to my.govalid.org or visit nexhub.earth
- Navigate to Template NexHub to browse templates, or Create NexHub to start from scratch
- Choose a template or start blank
- Customize your hub with content blocks
- Set your hub slug for a shareable URL
- Click Generate NexHub Page to publish
From Template
- Go to Template NexHub
- Browse and select a template
- Choose background style preferences
- Customize content and theme
- Publish
From Scratch
- Go to Create NexHub
- Select Hub as the QR type
- Configure Quick Design (background, button shape, effect)
- Fill in Hub Page Detail (name, slug, profile photo)
- Add content blocks via Hub Blocks
- Customize your QR via QR Design Customization
- Click Generate NexHub Page to publish and share
Related
- QR Codes - Create QR codes linking to your hub
- NexCommunity - Community features and trust system
- Anti-Counterfeit - Product authentication